
The Domain Name System (DNS) gives resources stable human-readable names to solve various potential internet problems; for example, it translates domain names to IP addresses so users don’t have to remember long numbers to access websites. Administrators can create records of several standardized types, and each type solves a specific problem. If you ever wondered how DNS records work, what each record type does, and how to manage DNS records, this article is the right place to start.
What Is a DNS Record?
Every interaction on the internet involves a translation process, where a human-readable domain name becomes a machine-understandable IP address. DNS records are the essential building blocks of this process. They come in several types to handle different aspects of internet operations, such as routing emails (MX records) and aliasing one domain name to another (CNAME records.)
DNS records are aliases for short pieces of text stored in a DNS database, and each one maps a specific domain to an IP address or another piece of data. For example, if you have the alias example.com, you can send it to a DNS server to connect to the aliased value 2606:2800:220:1:248:1893:25c8:1946.

Alt:
Each DNS record contains various pieces of information like the name of the host, the type of DNS record, the data associated with it, and the TTL (time to live) value. We’ll explain all the information inside a record later in this article. Understanding DNS records is fundamental to maintaining a reliable and efficient online presence.
What Problems Do DNS Records Solve?
The primary problems DNS records solve are giving IP addresses human-readable names (i.e., domain names) and decoupling services from one another. You achieve the latter by adding a DNS record as an indirection between services, so if one service’s IP or domain name changes, you only need to change the related DNS record, and the consuming service can remain unchanged. Let’s look at some examples:
- The A record maps a domain name like example.com to an IPv4 address like 192.168.0.1.
- The CNAME record maps a domain name like mail.example.com to another domain name like customer123.mailprovider.net.
- The TXT name maps a domain name like hello.example.com to arbitrary text like “Hello, world!”.
Don’t fret if these examples don’t yet make sense to you, as we will look into the details in the following sections of this article. By the end of the article, you’ll know what they mean!
How Do DNS Records Work?
Every time you type a URL into your browser, click on a link, or send an email (among other things) a DNS query is initiated in a process called DNS lookup. This query works its way through the hierarchical structure of the DNS until it reaches the DNS server responsible for the specific domain. This server contains the DNS records for that domain. You can learn about this process in our dedicated article under “How Does DNS Lookup Work?”
Each domain has several DNS records associated with it, like an address book, that help to direct traffic to the right location. For instance, an A record translates a domain name into an IP address that computers can understand. Here’s a table showing the range of DNS records:
| DNS Record Type | Purpose | Example |
| A | Translates a domain name into an IPv4 address | A record for “example.com” pointing to “192.168.1.1” |
| AAAA | Translates a domain name to an IPv6 address | AAAA record for “example.com” pointing to “2001:0db8:85a3::8a2e:0370:7334” |
| CNAME | Creates an alias for a domain name | CNAME record for “shop” to example.com domain name pointing to “website-builder.ursite.com” |
| MX | Shows which mail servers are in charge of receiving emails | MX record for “example.com” pointing to “mail.example.com” |
| TXT | Store text information for various purposes such as SPF configuration or domain name verification | TXT record for “example.com” with an email SPF configuration |
| NS | Stands for “name servers;” specifies authoritative name servers for the domain name | NS record for “example.com” pointing to “ns1.example.com” and “ns2.example.com” |
| SOA | Provides essential parameters for the zone, including primary name server and administrator email address | Provides essential parameters for the zone (e.g., ns1.example.com, admin.example.com) |
When a DNS server receives a query, it checks the DNS records of the relevant domain in its zone file. The server then responds with the corresponding record’s data, effectively directing the user’s device to the correct IP address.
A DNS record is an entry in a zone used by a DNS server. The DNS system is split into zones, each managed by a DNS server that keeps zone-related records in a zone. The entries in this file have the following structure:
- The name field contains a fully qualified domain name, the alias discussed earlier.
- The type field contains the record type; it describes how to interpret the data field.
- The data field contains the aliased text, for example, an IP address or another domain.
- The time to live (TTL) contains the time (in seconds) a client can cache the resolved data locally.
- The class field contains a protocol class. On the internet, its value is always IN.
| Name | Type | Data | TTL | Class |
| example.com | A | 93.184.216.34 | 86400 | IN |
| home.example.com | CNAME | customer123.webhoster.com. | 900 | IN |
| example.com | TXT | John Doe is the owner of this domain | 600 | IN |
Common DNS Record Types
Now that you understand DNS records and how they work, let’s look at the most common record types. Again, DNS records are just aliases for text; their type determines their purpose.
A and AAAA DNS Records
These types of DNS records map domain names to IP addresses. They are at the end of every resolution process because computers can only communicate with each other through IP addresses. There are two IP address record types; the A type is for IPv4, and the AAAA type is for IPv6 addresses.
The internet grew so much that IPv4 could no longer handle the number of devices requiring IP addresses. IPv6 allows significantly more devices to be addressed on the internet.
Examples of A and AAAA DNS records:
| Name | Type | Data | TTL | Class |
| example.com | A | 93.184.216.34 | 86400 | IN |
| google.com | A | 142.251.214.142 | 300 | IN |
| wikipedia.org | A | 198.35.26.96 | 600 | IN |
| example.com | AAAA | 2606:2800:220:1:248:1893:25c8:1946 | 86400 | IN |
| google.com | AAAA | 2607:f8b0:4005:811::200e | 300 | IN |
| wikipedia.org | AAAA | 2620:0:863:ed1a::1 | 600 | IN |
CNAME and ANAME DNS Records
CNAME records allow you to map a subdomain to another domain, unlike A/AAAA records, which only allow you to map a domain to an IP address. Some DNS providers offer non-standard ANAME records, sometimes called ALIAS records, or CNAME Flattening.
A common use case for the ANAME record is hosting your website on the servers of a third-party provider that gives you a subdomain but no fixed IP address. You can’t create an A record because you don’t have an IP address, nor can you create a CNAME record because it would require a subdomain. An ANAME record is the only solution.
Examples of CNAME and ANAME DNS records:
| Name | Type | Data | TTL | Class |
| www.example.com | CNAME | example.com | 600 | IN |
| current.myapp.xyz | CNAME | version123.myapp.xyz | 300 | IN |
| example.com | ANAME | mysite.webhoster.com | 600 | IN |
If you want to learn more, check out our CNAME article.
The NS DNS Record Type
This record type defines the authoritative DNS servers for a DNS zone. Authoritative means the server holds all DNS records for that zone instead of caching DNS server responses from other zones.
If you own the example.com domain, you add an NS record for your DNS servers to the TLD server that manages all “com” domains. You can also add multiple NS records, providing clients with secondary DNS servers for load balancing or failover purposes.
The target domains of NS records can be in the same zone, but don’t have to be; in fact, most websites use the DNS servers of their domain provider, which the provider hosts in their zone. NS records are crucial for DNS because they’re part of the mechanism that links all DNS servers to form the global DNS tree structure. Here are some examples of NS DNS records:
| Name | Type | Data | TTL | Class |
| example.com | NS | a.iana-servers.net | 86400 | IN |
| gcore.com | NS | ns2.gcdn.services | 300 | IN |
MX DNS Records
MX records are used for mail service discovery. If you send an email, your email client will use the part after the @ in a DNS query for an MX record in order to find the receiving mail server. Here are some examples of MX DNS records:
| Name | Type | Data | TTL | Class |
| example.com | MX | mail.example.com | 600 | IN |
| gcore.com | MX | gcore-com.mail.protection.outlook.com | 3600 | IN |
If you want to learn more about MX records, check out our MX record article.
TXT DNS Records
You use TXT records for all DNS-related use cases that don’t have a dedicated record type. You can use a TXT record to map a domain name to arbitrary text. The size limit is 255 characters (or octets.)
An example of a use case for TXT records is domain verification, where you create a special TXT record to prove you own the domain. Another example is stable URLs for content-based identifiers (CIDs) in the interplanetary file system (IPFS.) These CIDs change when the content they address changes, so saving them in a TXT record enables IPFS clients to query that record to ensure they always get the newest CID for their desired content. Here are some examples of TXT DNS records:
| Name | Type | Data | TTL | Class |
| example.com | TXT | Jane Doe owns this domain. | 900 | IN |
| _dnslink.docs.ipfs.tech | TXT | dnslink=/ipfs/QmVMxjouRQCA2QykL5Rc77DvjfaX6m8NL6RyHXRTaZ9iya | 3600 |
How to Manage DNS Records
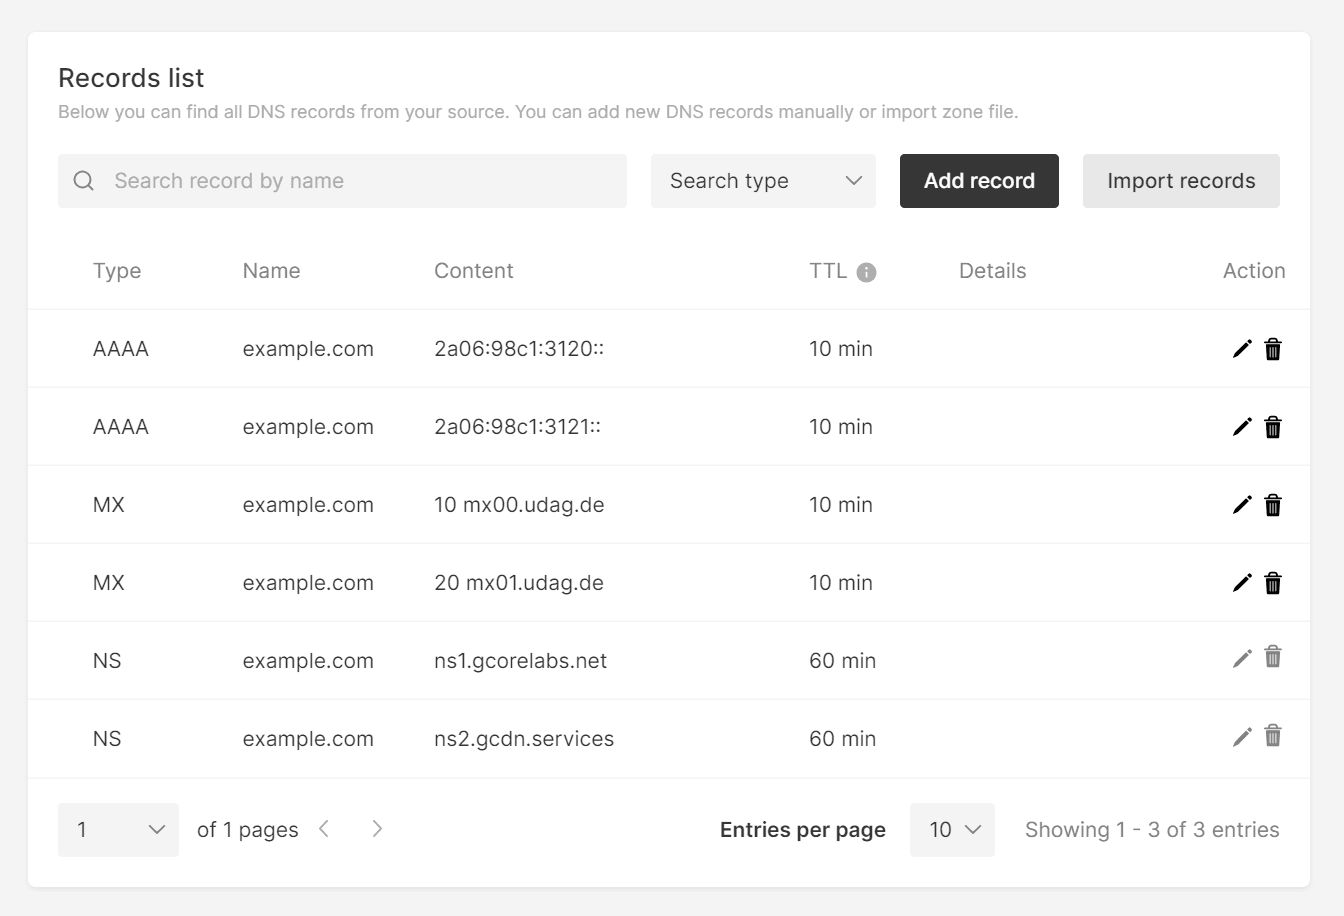
You can manage DNS records by using the web UI of your domain provider or by running your own DNS server. Using the web UI of your domain provider is the easiest option. It will present you with a list of records and allow you to create, update, and delete them. Below is a screenshot from the Gcore DNS record UI. The UI of your provider may look different, but overall it will have similar features.
Gcore allows you to import DNS records from a zone file, specifically, a BIND zone file. BIND is a popular open-source DNS server, and many providers and DNS server implementations use the BIND zone file format as their import and export format, so let’s have a quick overview of how to use it.
How to Manage DNS Records with a Zone File
Caution: As we dive into the complexities of zone files and DNS record intricacies, note that the upcoming discussion is particularly tailored for those with a higher level of technical expertise in DNS operations—beginners, however, should not be deterred, as every expert was once a beginner!
Each authoritative DNS server is responsible for a zone, which is made up of one or more domain names. Nowadays, popular DNS servers like PowerDNS and Microsoft DNS store and manage their DNS records via databases. However, the BIND zone file format is still used as a general text representation. You can create a zone file to define DNS records or export one from an existing provider or system, and then import it into a DNS server that stores them in their database.
Each line in the zone file that starts with a domain name or a placeholder becomes a DNS record, and each line that begins with a dollar sign becomes a variable. Semicolons initiate comments, and parentheses let you split record definitions over multiple lines.
Let’s look at the following example:
; zone file of examples.com$ORIGIN example.com.$TTL 3600@ IN SOA ns.example.com. admin.example.com. ( 2022040101 ; Zone file serial number 3600 ; Refresh 1800 ; Retry 3600 ; Expire 3600) ; Minimum TTL @ IN NS ns.example.com.@ IN MX 10 mail.example.com.@ IN A 192.0.2.1mail IN A 192.0.2.2ns IN A 192.0.2.3@ IN AAAA 2001:db8::1www IN CNAME example.com.@ 7200 IN TXT "v=spf1 ip4:192.0.2.1 -all"customer1 IN NS ns.customer1.net.Now let’s break down what this zone file tells us:
- The first line is a comment that describes to which zone the file belongs.
- The second line defines the
$ORIGINvariable with the valueexample.com. The trailing dot makes it a fully qualified domain name that starts from the root of all domains. You can see it a bit like an absolute file path. To use the$ORIGINvariable, you can use the@symbol as a placeholder. Everywhere you write@, the content of the$ORIGINvariable will be added—in this case,example.com. - Use the
$TTLvariable to set the default caching time for each DNS record that doesn’t define its TTL explicitly. - The SOA record is mandatory for a zone file; the example uses parentheses to split it over multiple lines for readability and includes comments to explain the numbers. It also uses the
@placeholder, so we don’t have to repeat our domain root. - One NS record is also mandatory to define the authoritative DNS server of the zone.
- Subdomains are the next element. The A record for the email server only uses mail as a name. Since it doesn’t include a trailing dot, it will become a subdomain of the domain root.
- The TXT record defines an explicit TTL with 7200 seconds, which overrides the default of 3600.
- The last entry is an NS record for a subdomain; it delegates the resolution of the
customer1subdomain and all the subdomains under it to another DNS server.
Conclusion
DNS records let you define domain names for everything connected to the internet, including IP addresses, other domain names, email addresses, and anything you can represent in a short text. NS records even include the very mechanism that binds the distributed DNS network together. Since DNS is essentially a huge distributed lookup table, you can use it for all kinds of data you want to make accessible via a domain name, including addresses for mail or DNS servers, proofs of ownership, and more obscure things like CIDs for IPFS resources.
Gcore provides DNS servers for your domains and allows you to manage your DNS records in an intuitive UI. The servers are in different locations worldwide to ensure low latency resolutions for your users and come with automatic failover out-of-the-box.
Related articles
How to cut egress costs and speed up delivery using Gcore CDN and Object Storage
If you’re serving static assets (images, videos, scripts, downloads) from object storage, you’re probably paying more than you need to, and your users may be waiting longer than they should.In this guide, we explain how to front your bucket with Gcore CDN to cache static assets, cut egress bandwidth costs, and get faster TTFB globally. We’ll walk through setup (public or private buckets), signed URL support, cache control best practices, debugging tips, and automation with the Gcore API or Terraform.Why bother?Serving directly from object storage hits your origin for every request and racks up egress charges. With a CDN in front, cached files are served from edge—faster for users, and cheaper for you.Lower TTFB, better UXWhen content is cached at the edge, it doesn’t have to travel across the planet to get to your user. Gcore CDN caches your assets at PoPs close to end users, so requests don’t hit origin unless necessary. Once cached, assets are delivered in a few milliseconds.Lower billsMost object storage providers charge $80–$120 per TB in egress fees. By fronting your storage with a CDN, you only pay egress once per edge location—then it’s all cache hits after that. If you’re using Gcore Storage and Gcore CDN, there’s zero egress fee between the two.Caching isn’t the only way you save. Gcore CDN can also compress eligible file types (like HTML, CSS, JavaScript, and JSON) on the fly, further shrinking bandwidth usage and speeding up file delivery—all without any changes to your storage setup.Less origin traffic and less data to transfer means smaller bills. And your storage bucket doesn’t get slammed under load during traffic spikes.Simple scaling, globallyThe CDN takes the hit, not your bucket. That means fewer rate-limit issues, smoother traffic spikes, and more reliable performance globally. Gcore CDN spans the globe, so you’re good whether your users are in Tokyo, Toronto, or Tel Aviv.Setup guide: Gcore CDN + Gcore Object StorageLet’s walk through configuring Gcore CDN to cache content from a storage bucket. This works with Gcore Object Storage and other S3-compatible services.Step 1: Prep your bucketPublic? Check files are publicly readable (via ACL or bucket policy).Private? Use Gcore’s AWS Signature V4 support—have your access key, secret, region, and bucket name ready.Gcore Object Storage URL format: https://<bucket-name>.<region>.cloud.gcore.lu/<object> Step 2: Create CDN resource (UI or API)In the Gcore Customer Portal:Go to CDN > Create CDN ResourceChoose "Accelerate and protect static assets"Set a CNAME (e.g. cdn.yoursite.com) if you want to use your domainConfigure origin:Public bucket: Choose None for authPrivate bucket: Choose AWS Signature V4, and enter credentialsChoose HTTPS as the origin protocolGcore will assign a *.gcdn.co domain. If you’re using a custom domain, add a CNAME: cdn.yoursite.com CNAME .gcdn.co Here’s how it works via Terraform: resource "gcore_cdn_resource" "cdn" { cname = "cdn.yoursite.com" origin_group_id = gcore_cdn_origingroup.origin.id origin_protocol = "HTTPS" } resource "gcore_cdn_origingroup" "origin" { name = "my-origin-group" origin { source = "mybucket.eu-west.cloud.gcore.lu" enabled = true } } Step 3: Set caching behaviorSet Cache-Control headers in your object metadata: Cache-Control: public, max-age=2592000 Too messy to handle in storage? Override cache logic in Gcore:Force TTLs by path or extensionIgnore or forward query strings in cache keyStrip cookies (if unnecessary for cache decisions)Pro tip: Use versioned file paths (/img/logo.v3.png) to bust cache safely.Secure access with signed URLsWant your assets to be private, but still edge-cacheable? Use Gcore’s Secure Token feature:Enable Secure Token in CDN settingsSet a secret keyGenerate time-limited tokens in your appPython example: import base64, hashlib, time secret = 'your_secret' path = '/videos/demo.mp4' expires = int(time.time()) + 3600 string = f"{expires}{path} {secret}" token = base64.urlsafe_b64encode(hashlib.md5(string.encode()).digest()).decode().strip('=') url = f"https://cdn.yoursite.com{path}?md5={token}&expires={expires}" Signed URLs are verified at the CDN edge. Invalid or expired? Blocked before origin is touched.Optional: Bind the token to an IP to prevent link sharing.Debug and cache tuneUse curl or browser devtools: curl -I https://cdn.yoursite.com/img/logo.png Look for:Cache: HIT or MISSCache-ControlX-Cached-SinceCache not working? Check for the following errors:Origin doesn’t return Cache-ControlCDN override TTL not appliedCache key includes query strings unintentionallyYou can trigger purges from the Gcore Customer Portal or automate them via the API using POST /cdn/purge. Choose one of three ways:Purge all: Clear the entire domain’s cache at once.Purge by URL: Target a specific full path (e.g., /images/logo.png).Purge by pattern: Target a set of files using a wildcard at the end of the pattern (e.g., /videos/*).Monitor and optimize at scaleAfter rollout:Watch origin bandwidth dropCheck hit ratio (aim for >90%)Audit latency (TTFB on HIT vs MISS)Consider logging using Gcore’s CDN logs uploader to analyze cache behavior, top requested paths, or cache churn rates.For maximum savings, combine Gcore Object Storage with Gcore CDN: egress traffic between them is 100% free. That means you can serve cached assets globally without paying a cent in bandwidth fees.Using external storage? You’ll still slash egress costs by caching at the edge and cutting direct origin traffic—but you’ll unlock the biggest savings when you stay inside the Gcore ecosystem.Save money and boost performance with GcoreStill serving assets direct from storage? You’re probably wasting money and compromising performance on the table. Front your bucket with Gcore CDN. Set smart cache headers or use overrides. Enable signed URLs if you need control. Monitor cache HITs and purge when needed. Automate the setup with Terraform. Done.Next steps:Create your CDN resourceUse private object storage with Signature V4Secure your CDN with signed URLsCreate a free CDN resource now

How do CDNs work?
Picture this: A visitor lands on your website excited to watch a video, buy an item, or explore your content. If your page loads too slowly, they may leave before it even loads completely. Every second matters when it comes to customer retention, engagement, and purchasing patterns.This is where a content delivery network (CDN) comes in, operating in the background to help end users access digital content quickly, securely, and without interruption. In this article, we’ll explain how a CDN works to optimize the delivery of websites, applications, media, and other online content, even during high-traffic spikes and cyberattacks. If you’re new to CDNs, you might want to check out our introductory article first.Key components of a CDNA CDN is a network of interconnected servers that work together to optimize content delivery. These servers communicate to guarantee that data reaches users as quickly and efficiently as possible. The core of a CDN consists of globally distributed edge servers, also known as points of presence (PoPs):Origin server: The central server where website data is stored. Content is distributed from the origin to other servers in the CDN to improve availability and performance.Points of presence (PoPs): A globally distributed network of edge servers. PoPs store cached content—pre-saved copies of web pages, images, videos, and other assets. By serving cached content from the nearest PoP to the user, the CDN reduces the distance data needs to travel, improving load times and minimizing strain on the origin server. The more PoPs a network has, the faster content is served globally.How a CDN delivers contentCDNs rely on edge servers to store content in a cache, enabling faster delivery to end users. The delivery process differs depending on whether the content is already cached or needs to be fetched from the origin server.A cache hit occurs when the requested content is already stored on a CDN’s edge server. Here’s the process:User requests content: When a user visits a website, their device sends a request to load the necessary content.Closest edge server responds: The CDN routes the request to the nearest edge server to the user, minimizing travel time.Content delivered: The edge server delivers the cached content directly to the user. This is faster because:The distance between the user and the server is shorter.The edge server has already optimized the content for delivery.What happens during a cache miss?A cache miss occurs when the requested content is not yet stored on the edge server. In this case, the CDN fetches the content from the origin server and then updates its cache:User requests content: The process begins when a user’s device sends a request to load website content.The closest server responds: As usual, the CDN routes the request to the nearest edge server.Request to the origin server: If the content isn’t cached, the CDN fetches it from the origin server, which houses the original website data. The edge server then delivers it to the user.Content cached on edge servers: After retrieving the content, the edge server stores a copy in its cache. This ensures that future requests for the same content can be delivered quickly without returning to the origin server.Do you need a CDN?Behind every fast, reliable website is a series of split-second processes working to optimize content delivery. A CDN caches content closer to users, balances traffic across multiple servers, and intelligently routes requests to deliver smooth performance. This reduces latency, prevents downtime, and strengthens security—all critical for businesses serving global audiences.Whether you’re running an e-commerce platform, a streaming service, or a high-traffic website, a CDN ensures your content is delivered quickly, securely, and without interruption, no matter where your users are or how much demand your site experiences.Take your website’s performance to the next level with Gcore CDN. Powered by a global network of over 180+ points of presence, our CDN enables lightning-fast content delivery, robust security, and unparalleled reliability. Don’t let slow load times or security risks hold you back. Contact our team today to learn how Gcore can elevate your online presence.Discover Gcore CDN

What is a CDN?
Whether you’re running an e-commerce store, streaming videos, or managing an app, delivering content quickly and reliably is essential to keeping users satisfied. This is where a content delivery network (CDN) comes into play. A CDN is a globally distributed network of servers that work together to deliver content to users quickly, minimizing latency. Instead of relying on a single server, a CDN uses edge servers—called points of presence (PoPs)—to cache or temporarily store copies of your content closer to the user. This optimizes website performance, drastically cuts down on load times, and improves the user experience. Research suggests that a one-second lag in page loading speed can significantly decrease engagement, citing a 7% decline in conversions and an 11% decrease in page visits. CDNs considerably speed up load times by reducing latency through content caching closer to the user. By splitting up your website’s traffic over several servers, CDNs also protect it from online threats. Distributed denial-of-service (DDoS) attacks are lessened by CDNs because they spread traffic among a network of servers, improving security and availability. What Challenges Do CDNs Address?CDNs tackle two key challenges to improve website and application performance: Slow load times: Users sometimes experience frustratingly slow-loading websites and applications. This is because data must travel from a server to the end user’s device, causing latency. CDNs move servers closer to end users, reducing the distance that data has to travel and speeding up load times. High traffic volumes: High traffic volumes during peak times or cyberattacks can overwhelm your website and lead to latency or site unavailability. Since CDNs distribute traffic across multiple servers, no single server is overwhelmed. This helps prevent crashes and delivers smooth performance for all users.Common Use Cases for CDNsCDNs are vital across a range of industries, providing measurable improvements in content delivery and user experience. E-commerce websites use CDNs to guarantee quick page loading and frictionless shopping experiences, even during periods of high traffic. Speed is crucial for online businesses. A study found that the average cost of downtime for e-commerce websites is around $500,000 per hour. This includes lost sales, operational costs, and long-term damage to brand reputation Streaming services rely on CDNs to deliver high-quality video content while minimizing buffering. Netflix states that its CDN contributes to the daily delivery of over 125 million hours of streaming content, guaranteeing a seamless experience for customers worldwide. Gaming companies use CDNs to lower latency and provide a consistent real-time user experience, especially during live multiplayer matches, where it is essential to preserve an engaging and fair gameplay experience. News outlets and blogs benefit from CDNs by ensuring their content loads quickly for readers around the world, during large-scale traffic surges, especially during major events like elections or breaking news. The Benefits of a CDNFaster Website PerformanceEvery second counts when delivering content online. Slow websites frustrate users and harm your business. CDNs speed up content delivery by caching data closer to users, reducing page and file load times. Whether you’re delivering static content (such as CSS, HTML or JPG files) or dynamic content (like data generated by user interactions or API calls), a CDN ensures optimal performance regardless of user location. While factors like DNS settings, server configurations, and code optimization all play a role, the physical distance between your origin server and your users is a factor that only a CDN can solve. Increased Availability and ReliabilityDowntime can seriously affect online businesses. Hardware failures, traffic surges, and cyberattacks can reduce your website’s availability, harming your customers’ experience and causing financial or reputational damage. In fact, around 98% of organizations report that just one hour of downtime costs over $100,000. A CDN ensures that your website remains available, fast, and reliable by leveraging essential features such as: Load balancing: This process dynamically distributes traffic across multiple servers to optimize performance and prevent overload.Intelligent failover: Automatically redirects traffic if a server goes offline, ensuring continuity with minimal disruption.Anycast routing: Directs users to the closest or most efficient server, further reducing latency and enhancing response times.Security FeaturesAs cyber threats continue to grow in sophistication and frequency, securing your website or application is more critical than ever. According to recent statistics from Cobalt’s 2024 Cybersecurity Report, weekly attacks worldwide increased by 8% in 2023, while attackers used more sophisticated strategies to exploit vulnerabilities. Strong security measures that not only safeguard your website but also guarantee optimal performance are necessary in light of these evolving threats. CDN security features not only improve website performance but also defend against a wide range of attacks by distributing traffic across multiple servers, which mitigates DDoS attacks and filters out malicious traffic before it reaches your website. These features, from DDoS protection to safeguarding APIs, help maintain uptime, protect sensitive data, and guarantee a seamless user experience. Most modern solutions like Gcore CDN integrate robust security measures into content delivery, such as:SSL/TLS encryption facilitates secure data transmission by encrypting traffic, protecting sensitive information from being intercepted.L3/L4 DDoS protection blocks large-scale cyberattacks designed to flood your network and disrupt services.L7 DDoS protection guards your website from more complex attacks targeting how the website functions, helping it continue to operate smoothly.Web application firewall (WAF) acts as a shield, blocking harmful traffic such as hacking attempts or malicious scripts before they can affect your site.API security protects the communication between your application and other software, preventing unauthorized access or data theft.Bot protection identifies harmful automated traffic (bots), preventing activities like data scraping or login attempts with stolen credentials while allowing useful bots (like search engine crawlers) to function normally. Elevate Your Online Experience With a CDNA CDN is no longer a luxury—it’s a necessity for businesses that want to deliver fast, reliable, and secure online experiences. Whether your goal is to optimize performance, manage high traffic, or protect your site from attacks, a well-configured CDN makes all the difference.Ready to enhance your website’s performance? Our futureproof CDN runs on a global network of over 180 points of presence, so your customers get outstanding performance no matter where in the world they’re located. Get in touch with our team today to learn how our CDN can benefit your business.Discover Gcore CDN

How to Migrate Your Video Files to Gcore Video Streaming
Migrating large volumes of video files from different platforms can be daunting and time-consuming, often discouraging companies from moving to a superior provider. But it doesn’t have to be this way. We’ve created this three-step guide to help you efficiently migrate your video files to Gcore from other popular streaming platforms.Step 1: Get Links to Your VideosFirst, obtain links to your videos and download them. Look for your provider in the list below, or refer to the general SFTP/S3 storage section if applicable. After completing the steps for your provider, go straight to step 2.Google DriveShare the file: Open Google Drive and locate the MP4 file you want to download. Right-click on the file and select “Share.”Get the shareable link: In the sharing settings, click “Get link.” Ensure the link-sharing option is turned on.Set sharing permissions: Adjust the sharing permissions so “Anyone with the link” can view or download the file. Copy the generated link.Amazon S3Edit S3 block public access settings: Go to the S3 management console, select the bucket containing your MP4 file, and edit the Block Public Access settings if necessary.Add a bucket policy: Implement a bucket policy that grants public read access to your files.Get the list of objects: Navigate to the Objects tab, find your MP4 file, and click on the file to obtain the Object URL, which will be your download link.VimeoAccess the video: Log in to your Vimeo account and go to the video you wish to download.Select options: Click on the “Settings” button (gear icon) below the video player.Get video file link: In the settings menu, go to the “Video File” tab, where you can find the download link for your MP4 file.MUXEnable master access: Log in to your MUX account, navigate to the video asset, and enable master access if it’s not already enabled.Retrieve URL to master: Once master access is enabled, the URL to the master file will be available in the video asset details. Copy this URL for downloading the file.DropboxCreate a shareable link: Log in to your Dropbox account and locate the MP4 file you want to share. Click on the “Share” button next to the file.Set access permissions: In the sharing settings, create a link and set the permissions to “Anyone with the link.” Copy the generated link to download the file.General SFTP or S3 StorageAccess storage: Log in to your SFTP or S3 storage service control panel.Manage buckets/directories: Navigate to the appropriate bucket or directory containing your MP4 files.Retrieve download links: Generate HTTP/S links for the files you want to download. You can then use these links to download the files directly.Step 2: Check Availability to DownloadEnsure that your video files are available and ready for download, preventing any interruptions or issues during the migration process.Open HTTP/S link in a browser: Copy the HTTP/S link for the MP4 file and paste it into your browser’s address bar. Press Enter to navigate to the link.Check the video plays correctly in the browser: Verify that the video starts playing once the link is opened. This step ensures that the file is accessible and the link is functioning properly.Right-click to download: While the video is playing, right-click on the video player. Select “Save video as…” from the context menu. Choose a destination on your local disk to save the MP4 file.Step 3: Upload to Gcore Video StreamingNo matter which provider you’re migrating from, you need to upload your videos to Gcore Video Streaming storage. There are three primary methods to upload videos to Gcore storage:Copy from external storage: If your videos are available via public HTTPS URLs, you can directly copy the video files from external storage to Gcore. This method efficiently transfers files without downloading them to your local device first.Upload from a local device: Videos can be uploaded from your local host, backend, browser, or mobile app using the TUS resumable upload protocol. This method is resilient to interruptions, ensuring a smooth upload process by resuming from the point of failure.Batch upload: This method will soon be available to migrate extensive collections of videos, allowing you to transfer vast numbers of video files efficiently.The simplest migration option is to obtain video URLs and copy them to Gcore Video Hosting, eliminating the need to download and reupload videos.Example API Request to Copy Video from External StorageTo copy a video from another server, specify the origin_url attribute in the POST API request. The original video will be downloaded for video hosting on our server. Here is an example of the API request to set a task for copying a video from external storage:curl -L 'https://api.gcore.com/streaming/videos/' \-H 'Content-Type: application/json' \-H 'Authorization: APIKey 1234$0d16599c' \-d '{ "video": { "name": "Gcore Demo", "description": "Video copied from an external S3 Storage", "origin_url": "https://s-ed1.cloud.gcore.lu/demo-video/gcore.mp4" } }Refer to the complete documentation for detailed steps and examples of API requests. The original file must be in MP4 format or one of the following formats: 3g2, 3gp, asf, avi, dif, dv, flv, f4v, m4v, mov, mp4, mpeg, mpg, mts, m2t, m2ts, qt, wmv, vob, mkv, ogv, webm, vob, ogg, mxf, quicktime, x-ms-wmv, mpeg-tts, vnd.dlna.mpeg-tts. Streaming formats like HLS (.m3u8/.ts) and DASH (.mpd/.m4v) are intended for final video distribution and cannot be used as original file formats. Here are examples of good and bad links:Good link: https://demo-files.gvideo.io/gcore.mp4Bad link (chunked HLS format): https://demo-files.gvideo.io/hls/master.m3u8Note: Currently, only one video can be uploaded per request, so transferring your library in batches will require automation.Migrate to Gcore Video Streaming TodayGcore Video Streaming makes video migration easy with support for multiple sources and automatic transcoding. Whether you’re moving files from cloud storage, hosting platforms, or API-based services, Gcore streamlines video administration. Store, process, and distribute videos in various formats, complete with features like subtitles and timeline previews.With seamless migration and automatic transcoding, Gcore ensures your videos are optimized and ready for distribution, saving you time and effort. Simplify your video management and ensure your content is always accessible and in the best format for your audience with Gcore’s robust video streaming solutions.

5 Ways to Improve Website Speed for E-Commerce
In part 1 of this guide, we explained why site speed matters for e-commerce and how you can track your current speed.Now, speed up your page load times with these five techniques.#1 Assess Your Current Site SpeedFirst, check your site’s current performance. Use tools like Google PageSpeed Insights or real user monitoring (RUM) tools. PageSpeed Insights evaluates individual web pages for mobile and desktop performance, providing actionable insights to improve speed and user experience.Here’s an example of how your metrics might look:#2 Adopt Code and Image Optimization TechniquesE-commerce websites often have a huge number of images, videos, and/or animations, which can slow down load times. Since these media are essential, the key is to optimize all heavy components.Compress images and use lazy loading via your website host. Minimize redirects and remove broken links, consulting a technical SEO expert if required. These actions can significantly reduce page weight.#3 Adopt CDNs and Edge ComputingThe majority of online shoppers have purchased from an e-commerce store in another country and an additional 22% plan to in the future. Hosting location impacts speed. The further your servers are physically located from your customers, the higher the latency. So, having servers distributed globally improves your load speed and allows you to deliver great customer experiences, no matter where your customers are located.Imagine that your e-commerce website is hosted on a web server in the US, but you have shoppers from the EU. When shoppers from the US browse your store, they may not experience much latency. But shoppers from Germany will, because of the time it takes their browser to send requests to your US server, wait for the server to process them, and deliver a response. A reliable CDN and edge computing provider caching your website content—images, videos, payment portals and all—at the edge makes for speedy content delivery globally.In addition to shortening the distance between your servers and buyers, CDNs also enable load balancing. Say you’re running a Black Friday sale with traffic surges far beyond your normal quantities. Your CDN provider can distribute the traffic evenly between its network of available servers, preventing any one server from being overworked, thereby improving server response times. So, if your Black Friday surge comes mostly from the New York area, a CDN can push some of that traffic from the New York, NY server to the nearby Manassas, VA and Boston, CT servers. Customers won’t notice a difference since both servers are nearby, but spreading the load means all servers continue to perform optimally.#4 Use Fast Authoritative DNSDNS is like the internet’s phone book, translating human-friendly domain names (like www.example.com) into IP addresses that computers use to find each other. When this translation happens quickly, it reduces the time it takes for a user’s browser to locate your website, leading to faster page load times.#5 Rinse and RepeatSite speed optimization is continuous. The internet changes daily; technology advances and competitors emerge. Don’t get comfortable with your site speed. Continuously track speed scores and make improvements.Website Speed Solutions in One Intuitive PlatformWebsite speed is a game-changer for e-commerce success. A website that loads in under a second is the magic number to boost user experience, slash bounce rates, and skyrocket your e-commerce business’ conversion rates.Stay ahead of your e-commerce competitors by choosing tools and platforms designed with your e-commerce website speed in mind. With 180+ PoPs worldwide and a 200+ Tbps network capacity, Gcore CDN and DNS are ideal speed optimization solutions for global e-commerce sites. Contact us today to discover how we can supercharge your site speed.Explore CDN for e-commerce

What Website Speed Is and Why It Matters for E-commerce Success
Website visitors are more impatient than ever—websites that take longer than three seconds to load lose more than half their visitors. For an e-commerce business, that translates to losing half its potential sales, which is bad news for revenue. In this article, we explain what e-commerce website speed is, how it’s measured, and how you can improve it for better customer retention and higher sales.Why Does Site Speed Matter?Website speed measures the time from when visitors click your link to when they see a fully functioning page. With the surge in e-commerce businesses around the world, buyers have many choices and will quickly abandon slow-loading websites out of frustration. Most customers won’t return to a slow website, and 89% will turn to a faster competitor. Satisfied customers are more likely to recommend your website to others, making high user satisfaction an effective marketing strategy.Just a second—or less—of load time can make the difference between a potential customer purchasing from you or your competitor. Conversion rates drop markedly with every additional second of load time. If your site loads in one second or less, you’re looking at a 3% conversion rate. That almost halves when you add just one second of wait time.That’s not surprising, since churn and bounce rates increase with slower load times, meaning potential buyers either leave your site before interacting and/or don’t return.Page load times also affect search engine optimization (SEO) rankings—your spot on search engine results pages. When buyers search for your products, if you don’t appear at the top, your competitors will—and your customers are more likely to visit their site instead of yours.Evidently, optimizing page load time is a non-negotiable for any e-commerce business.Metrics and Indicators to TrackSpeed can be measured and reflected by either technical or business metrics.Technical IndicatorsGoogle Core Web Vitals are metrics that measure various features contributing to a high-quality page experience. They’re an industry-standard way to measure your technical website load speed.Largest contentful paint (LCP) is the time it takes for the largest content on your site to load. An ideal LCP value is below 2.5 seconds, while above 4 seconds signals a poor page experience.First input delay (FID) is the delay between a user’s interaction (e.g., clicking a button) and the browser’s response. Google considers any FID value below 100 ms good, and above 300 ms poor.Cumulative layout shift (CLS) measures how much your content moves around while loading. Poor CLS can cause users to accidentally click on the wrong buttons.Keep track of the following additional technical metrics:Time to first byte (TTFB) is the time between a browser requesting your webpage and the first byte of data arriving. It often triggers the “reduce initial server response time” message in page speed diagnostics.Time to interactive (TTI) measures the time it takes for your website to become fully interactive. Google considers a TTI of below 5 seconds good, and above 7.3 seconds poor.Round-trip time (RTT) is the time it takes for requests to reach the origin server, be processed, and return to the client.Business MetricsThese metrics give you insights into how your website’s speed impacts sales. Although they’re not a direct speed measurement, speed has a direct impact on them.Conversion rate measures the percentage of your website’s visitors who make a purchase.Engagement time measures how much time customers actively spend on your website, such as browsing products or making a purchase. It’s connected to bounce rate, which is the opposite—how many customers leave your site without engaging at all, often caused by slow loading.Search ranking affects your site’s visibility, traffic, and revenue. Fast load times contribute to better SEO rankings.Explore part 2 of this guide to discover 5 practical tips to speed up your e-commerce website performance.
Subscribe to our newsletter
Get the latest industry trends, exclusive insights, and Gcore updates delivered straight to your inbox.