Radar has landed - discover the latest DDoS attack trends. Get ahead, stay protected.Get the report
Under attack?

Products

Solutions

Resources

Partners

Why Gcore

  1. Home
  2. Developers
  3. What Is a DNS Zone?

What Is a DNS Zone?

  • By Gcore
  • June 27, 2023
  • 9 min read
What Is a DNS Zone?

The Domain Name System (DNS) is a naming database that enables your computer to identify and translate a domain name (e.g., google.com) into an IP address (e.g., 74.125.226.72). DNS zones are specific portions of the DNS managed by a particular organization or administrator. These DNS zones are critical to the DNS as a whole as they simplify the management of DNS records across large, distributed networks. This article is a deep-dive into DNS zones. We explain what DNS zones are, how they work, and why they are important for managing DNS records.

Understanding the Basics of DNS Zones

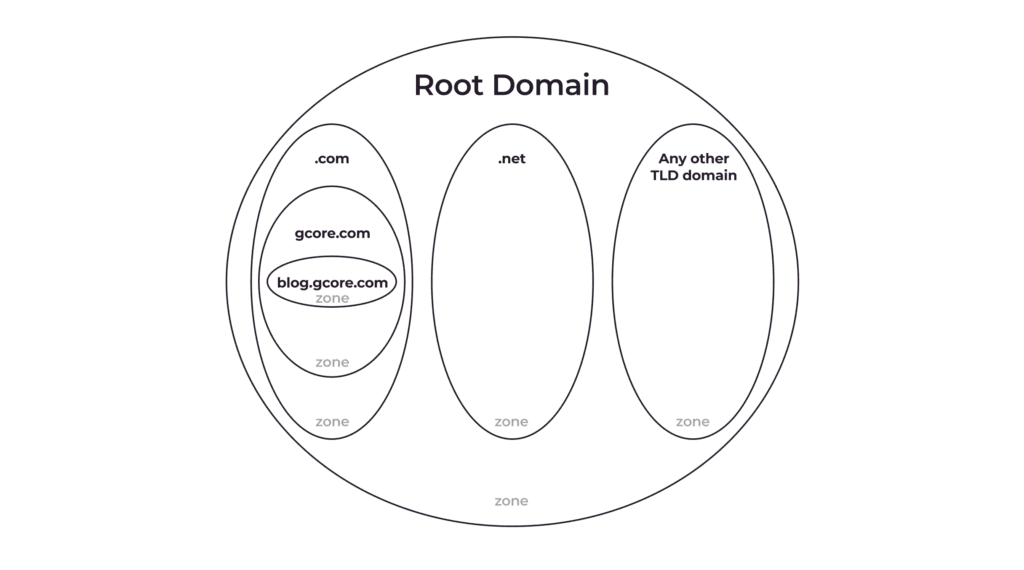
A DNS zone is a logical entity that refers to a specific domain and its subdomains managed by a single administrator. This concept is quite complex, so let’s break it down.
What Exactly Is a DNS Zone?

A DNS zone is not a material entity. It is a term people use to show that a specific domain—or a part of it (a subdomain/subdomains)—is managed by a single administrator. The administrator can manage DNS records related to their DNS zone by changing, adding, or deleting records.

When you buy a domain, you automatically get control of its DNS zone; you can manage the DNS record of this domain and its subdomains. However, if you want, you can separate out (delegate) some subdomains so that they are managed by someone else. Such a separation means that you create a new DNS zone which contains only the separated subdomain(s).

Why Create a Separate DNS Zone?

The domain owner can separate subdomains and create a new DNS zone for the convenience of managing DNS records. For example, gcore.com has many subdomains, including:

  • account.gcore.com
  • api.gcore.com
  • speedtest.gcore.com

Let’s say a dedicated team is responsible for the speedtest. To allow them autonomy, we can separate speedtest.gcore.com into a separate DNS zone and let the speed test team become the administrator. If they want to move the speed test to different servers, or perhaps link it to a mail server, they can do so themselves without affecting the main site or requiring an external approval process.

FAQs About DNS Zones

What components does a DNS zone include?

A DNS zone includes resource records as its components. One SOA and two NS records are mandatory.

Are top-level domains also DNS zones?

Yes. They simply delegate control over their subdomains (i.e., second-level domains) to the owners of those subdomains.

How can you separate subdomains into a separate DNS zone?

You need to add NS records for the relevant subdomains to the main domain. For more info, check out the DNS Zone Delegation section of this article.

Does each DNS zone correspond to one file with its DNS records?

Yes. One DNS zone corresponds to one file that contains all the DNS records for that specific DNS zone.

Can one DNS zone contain different second-level domains?

No, it can only contain subdomains of the same domain or the domain itself.

Are DNS zones tied to specific DNS servers?

No. One DNS zone corresponds to one file with DNS records. Such a file can be stored on any DNS server. In other words, different files for different DNS zones can be stored on the same server.

What Is a DNS Zone File?

A DNS zone file is usually presented in the form of a plain-text file containing all the important information about a domain name. It contains resource records that are used to map and link domain names to corresponding requests.

A DNS zone file typically contains a Start of Authority (SOA) and NS record and other relevant resource records (RRs,) including—but not limited to—MX, CNAME, A, and TXT records. Let’s take a quick look at what the most common types of records do.

Resource records in DNS zone filesFunction(s)
SOA (start of authority) recordsProvide the primary source of authority for the domain, including all essential information like the primary DNS server, contact email address, and settings that control how the domain operates
NS (nameserver) recordsSpecify IP addresses of authoritative nameservers and which servers are responsible for providing DNS information about the domain
A (address) recordsMap the domain names to their associated IP addresses
MX (mail exchange) recordsIdentify the mail servers responsible for handling email for the domain
CNAME (canonical name) recordsProvide an alias with an actual domain name for existing A records.
TXT (text) recordsContain text-based information associated with the domain, such as SPF (Sender Policy Framework) records used for domain ownership validation.

What Does a DNS Zone File Look Like?

Here is an example of what a DNS zone file for gcore.com could look like in BIND format:

$TTL 1h@               IN      SOA     dns1.gcore.com. hostmaster.gcore.com. (                        20211209                        1d                        2h                        4w                        1h                        )                IN      NS      dns1.gcore.com.                IN      NS      dns2.gcore.com.                IN      MX      10      mail.gcore.com.dns1            IN      A       192.168.0.1dns2            IN      A       192.168.0.2mail            IN      A       192.168.0.3web             IN      A       192.168.0.4www             IN      CNAME   webftp             IN      CNAME   web@		IN	TXT     "v=spf1 a mx include:spf.gcore.com ~all"spf		IN	TXT	"v=spf1 include:spf.protection.outlook.com include:spf.emailsignatures365.com -all"

In this example, the DNS zone file begins with a time-to-live (TTL) directive, which sets the duration for caching DNS records. The “@” symbol represents the root of the domain. Next is the start of authority (SOA) record, which identifies the primary DNS server for the domain, and includes the administrator’s email address. Two nameservers are specified using the IN NS (Internet Nameserver) command, and an MX record is added to designate the mail server, and assign it a priority value of 10.

Several A records are included to define the IP address of various servers. These A records specify the DNS server, mail server and web server IP addresses. The zone file also contains CNAME records, which serve as aliases or alternative names for the web server. This allows different domain names to point to the same web server. Finally, a TXT record is included to specify the Sender Policy Framework (SPF) record for email authentication purposes. This record helps verify that incoming emails originate from authorized servers.

By structuring the DNS zone files like this, administrators can effectively manage the DNS records for their domain. This ensures proper routing of emails, website accessibility, and email authentication.

DNS Zone Delegation

DNS zone delegation is a process that involves dividing a larger DNS zone into smaller zones and assigning them to different DNS servers. This process enables more efficient and localized handling of DNS queries, particularly for larger organizations with multiple subdomains. By delegating zones, the burden on a single server is reduced, leading to improved performance and availability of the overall DNS infrastructure.

Let’s consider a scenario where a large organization manages a primary domain (e.g., example.com) as well as several subdomains (e.g., it.example.com, europe.example.com, us.example.com, etc.) To optimize DNS operations, the organization can delegate each subdomain to separate DNS servers, distributing the workload and enhancing efficiency.

How To Delegate a DNS Zone

To delegate a DNS zone, certain steps need to be followed. The administrator must create NS (nameserver) records for the subdomain. These NS records assign the authoritative servers responsible for handling DNS queries for the subdomain. For example, if the administrator delegates it.example.com subdomain, an NS needs to be added to the example.com zone file. This NS record signifies that the zone file governing the “it” subdomain has the authority to handle all associated DNS queries.

How Do DNS Zones Work?

Imagine that you own the domain example.com. Whenever someone enters example.com into their web browser, their device sends a DNS query to a server requesting the IP address for your website. The server then searches for authoritative DNS zones related to your domain and asks them for the IP address of your website. Once obtained, this IP address is used to establish a connection between the visitor’s device and the server hosting your website.

As the website owner or administrator, DNS zones allow you to manage DNS records for specific parts of your domain. For example, you can have separate DNS zones for mail.example.com or blog.example.com without affecting the records for the entire example.com domain.

To create such a DNS zone, you must specify the subdomain you want to manage in the server’s control panel and create NS records for the subdomain. The NS record can be in the form of an “A” record, which associates the subdomain with an IP address, or an “MX” record, which specifies the mail server for handling email for the subdomain.

What Are DNS Zone Changes?

DNS zone changes are modifications to the DNS information associated with a particular domain. These can include changes to the IP address of the server responsible for hosting the website, adjusting the mail server settings, or adding new servers. These modifications can occur intentionally or accidentally when the domain owner or their authorized representative makes them. However, it’s important to note that DNS zone changes can be maliciously induced by cybercriminals.

Why Track DNS Zone Changes?

Tracking DNS zone changes is crucial for maintaining smooth operation and security of a website. Changes to DNS records can have a significant impact on website functionality. A prime example is the 2021 Facebook outage, during which the website was inaccessible for about seven hours. The outage was caused by the loss of IP routes to the Facebook DNS servers. The resulting revenue loss for Facebook was between $60-100 million.

Furthermore, malicious DNS zone changes can pose serious risks. They can redirect visitors to unauthorized websites, compromising user security. These changes can also open back doors for intrusions into databases and potential breaches of user privacy, which are often triggered by DDoS attacks.

Companies can monitor changes to their domain’s DNS records by actively tracking DNS zone changes. This monitoring allows companies to identify and address any unauthorized or unexpected changes promptly and is essential for safeguarding online presence and protecting user trust.

How To Track DNS Zone Changes

There are five techniques that companies can deploy to track DNS zone changes:

Tracking TechniqueHow It Works
Zone Change Notification (ZCN)This feature allows DNS servers to send notifications to other DNS servers when a change occurs in a DNS zone. By enabling ZCN, DNS servers can stay updated with their zone information, and be used for replication of zones as and when needed.
DNS LoggingMany DNS servers provide logging capabilities, which monitor DNS queries and updates. These logs provide a record of DNS zone changes, enabling you to identify and troubleshoot issues arising from DNS zone changes.
External Monitoring ServicesThese services use automated tools to monitor DNS answers continuously. They detect changes, such as adding or removing DNS records, and send real-time alerts when DNS zone changes occur. This enables quick responses to potential issues.
DigThis command-line tool allows the user to retrieve DNS information, including DNS records, name servers, and IP addresses. Dig can also be used to track DNS zone changes by comparing DNS queries to DNS servers before and after the zone change, helping the user pinpoint differences.
DNS Query AnalysisThis technique analyzes DNS queries received by DNS servers to track changes in DNS zones. It provides valuable insights into the domains and subdomains being queried, the types of queries received, and the frequency of queries to specific DNS records. Monitoring these patterns can flag changes to the corresponding DNS zones.

Why Monitor DNS Zone Changes?

Monitoring DNS zone changes has three main benefits: detecting unauthorized changes immediately, ensuring DNS record accuracy, and improving IT resource management.

Immediate Detection of Unauthorized Changes

Unauthorized changes to DNS zones, whether accidental or malicious, can result in DNS errors, slow query response times, and even domain name resolution failures. Attackers may attempt to modify DNS records to redirect users to phishing sites, intercept traffic, or compromise sensitive information. Actively monitoring DNS zone changes helps mitigate these risks, promptly identifying any unauthorized modifications and enabling DNS administrators to take immediate action.

DNS Record Accuracy

When changes are made to a website or server IP address, corresponding updates to DNS records are necessary to ensure seamless user access to the new server. Incorrect or outdated DNS records can result in website downtime, slow page loading times or even complete website inaccessibility. By monitoring DNS zone changes, companies can verify the accuracy of DNS records, which is crucial for a seamless user experience and for proactively preventing potential problems.

Better IT Resource Management

Regular monitoring of DNS zone changes helps efficiently allocate IT resources. By staying up to date about changes, teams can optimize activities, minimize downtime, and reduce operational costs.

What Is a Reverse Lookup Zone?

A reverse lookup zone enables the identification of domain names associated with specific IP addresses. It works opposite to the more common forward lookup zone, which finds the IP address linked to a domain name.
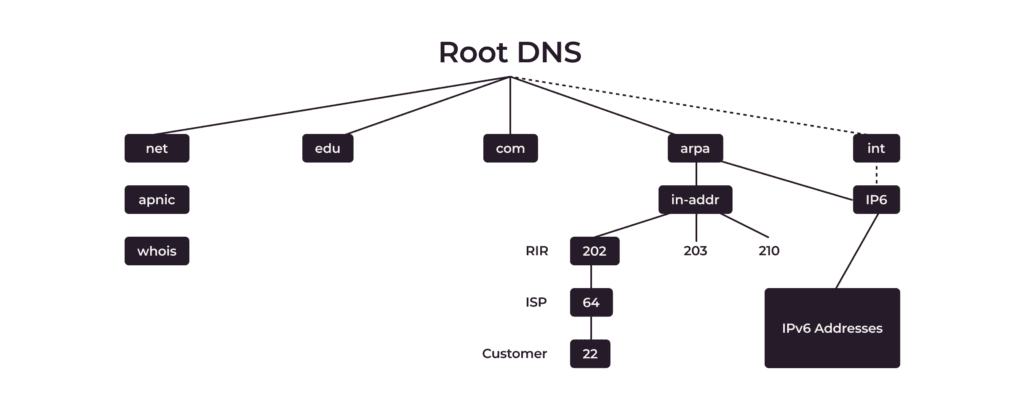
A reverse lookup zone utilizes special PTR (Pointer) records. It uses the in-addr.appa domain, and IP addresses are arranged from the less specific to the more specific, while the domain names are arranged from the more specific to the less specific. Consider the figure above, for example, the customer’s IP address is 22.64.202.in-addr.appa.

PTRs are always managed in the reverse zone (not forward zone,) like in-addr.arpa or ip6.arpa e.g <octet_2>.<octet_1>.in-addr.arpa. Your ISP must delegate the zone to your NSes. Therefore, when you perform a reverse lookup, the DNS server searches for the PTR record corresponding to the IP address you provide and retrieves the associated domain name.

Reverse lookup zones are particularly valuable in larger networks with numerous IP addresses for troubleshooting network issues. For example, if you detect suspicious activity originating from a particular IP address on your organization’s network, it’s easy to determine visually the domain name associated with that IP address.

Additionally, PTR records are widely used in public networks. You can identify the name associated with an IP address and make a fair assumption about who is responsible for the part of the network that is overloaded or generates malicious traffic. For example:

traceroute to 1.1.1.1 (1.1.1.1), 64 hops max, 52 byte packets 1  192.168.31.1 (192.168.31.1)  10.842 ms  3.846 ms  3.389 ms 2  192.168.178.1 (192.168.178.1)  5.021 ms  5.808 ms  5.727 ms 3  dhcp-077-249-057-001.chello.nl (77.249.57.1)  16.033 ms  13.006 ms  15.976 ms 4  212.142.51.25 (212.142.51.25)  11.897 ms  14.024 ms  12.946 ms 5  asd-tr0021-cr101-be112-2.core.as33915.net (213.51.7.92)  15.071 ms  14.261 ms  15.145 ms 6  nl-ams14a-ri1-ae51-0.core.as9143.net (213.51.64.186)  18.707 ms  16.519 ms  23.037 ms 7  213.46.191.210 (213.46.191.210)  15.810 ms  16.197 ms  16.946 ms 8  172.71.96.2 (172.71.96.2)  15.055 ms    172.70.44.2 (172.70.44.2)  14.475 ms    172.71.180.2 (172.71.180.2)  16.163 ms 9  one.one.one.one (1.1.1.1)  19.013 ms  17.318 ms  21.799 ms

You may notice that some addresses don’t have associated PTR records. Usually those addresses are from private IP spaces, and are being used on internal interfaces of the routers. Although we can’t see their name in public, most providers have PTRs for them on their own nameservers, and they are resolved when those nameservers are in use e.g., inside the provider’s network.

It is also worth mentioning that it is not mandatory for a PTR record to correspond to the forward record, and in general it can be an arbitrary domain name. As such, anyone with access to the in-addr.arpa subzone can create PTR for google.com or any other domain name, which in turn can mislead a user or network administrator.

Conclusion

DNS zones play a critical role in the broader DNS system, enabling efficient management of specific subsets of DNS records. Effective DNS management is essential for maintaining website accessibility and email delivery, and supporting various online activities. Poor DNS management can lead to reduced traffic, revenue loss and diminished user trust. Fortunately, companies can optimize DNS management by using appropriate tools and resources, enhancing both efficiency and security in communications between user devices and their chosen servers.

Gcore offers advanced features that empower companies to track DNS zones, detect unauthorized changes, and quickly resolve issues. Gcore’s services include comprehensive tracking, monitoring, and security functionalities. Gcore also provides fast, resilient, and reliable enterprise-grade DNS hosting services. With Gcore, companies can streamline DNS management and ensure a secure, seamless online experience for their users.

Related articles

How do CDNs work?

Picture this: A visitor lands on your website excited to watch a video, buy an item, or explore your content. If your page loads too slowly, they may leave before it even loads completely. Every second matters when it comes to customer retention, engagement, and purchasing patterns.This is where a content delivery network (CDN) comes in, operating in the background to help end users access digital content quickly, securely, and without interruption. In this article, we’ll explain how a CDN works to optimize the delivery of websites, applications, media, and other online content, even during high-traffic spikes and cyberattacks. If you’re new to CDNs, you might want to check out our introductory article first.Key components of a CDNA CDN is a network of interconnected servers that work together to optimize content delivery. These servers communicate to guarantee that data reaches users as quickly and efficiently as possible. The core of a CDN consists of globally distributed edge servers, also known as points of presence (PoPs):Origin server: The central server where website data is stored. Content is distributed from the origin to other servers in the CDN to improve availability and performance.Points of presence (PoPs): A globally distributed network of edge servers. PoPs store cached content—pre-saved copies of web pages, images, videos, and other assets. By serving cached content from the nearest PoP to the user, the CDN reduces the distance data needs to travel, improving load times and minimizing strain on the origin server. The more PoPs a network has, the faster content is served globally.How a CDN delivers contentCDNs rely on edge servers to store content in a cache, enabling faster delivery to end users. The delivery process differs depending on whether the content is already cached or needs to be fetched from the origin server.A cache hit occurs when the requested content is already stored on a CDN’s edge server. Here’s the process:User requests content: When a user visits a website, their device sends a request to load the necessary content.Closest edge server responds: The CDN routes the request to the nearest edge server to the user, minimizing travel time.Content delivered: The edge server delivers the cached content directly to the user. This is faster because:The distance between the user and the server is shorter.The edge server has already optimized the content for delivery.What happens during a cache miss?A cache miss occurs when the requested content is not yet stored on the edge server. In this case, the CDN fetches the content from the origin server and then updates its cache:User requests content: The process begins when a user’s device sends a request to load website content.The closest server responds: As usual, the CDN routes the request to the nearest edge server.Request to the origin server: If the content isn’t cached, the CDN fetches it from the origin server, which houses the original website data. The edge server then delivers it to the user.Content cached on edge servers: After retrieving the content, the edge server stores a copy in its cache. This ensures that future requests for the same content can be delivered quickly without returning to the origin server.Do you need a CDN?Behind every fast, reliable website is a series of split-second processes working to optimize content delivery. A CDN caches content closer to users, balances traffic across multiple servers, and intelligently routes requests to deliver smooth performance. This reduces latency, prevents downtime, and strengthens security—all critical for businesses serving global audiences.Whether you’re running an e-commerce platform, a streaming service, or a high-traffic website, a CDN ensures your content is delivered quickly, securely, and without interruption, no matter where your users are or how much demand your site experiences.Take your website’s performance to the next level with Gcore CDN. Powered by a global network of over 180+ points of presence, our CDN enables lightning-fast content delivery, robust security, and unparalleled reliability. Don’t let slow load times or security risks hold you back. Contact our team today to learn how Gcore can elevate your online presence.Discover Gcore CDN

What is a CDN?

Whether you’re running an e-commerce store, streaming videos, or managing an app, delivering content quickly and reliably is essential to keeping users satisfied. This is where a content delivery network (CDN) comes into play. A CDN is a globally distributed network of servers that work together to deliver content to users quickly, minimizing latency. Instead of relying on a single server, a CDN uses edge servers—called points of presence (PoPs)—to cache or temporarily store copies of your content closer to the user. This optimizes website performance, drastically cuts down on load times, and improves the user experience. Research suggests that a one-second lag in page loading speed can significantly decrease engagement, citing a 7% decline in conversions and an 11% decrease in page visits. CDNs considerably speed up load times by reducing latency through content caching closer to the user. By splitting up your website’s traffic over several servers, CDNs also protect it from online threats. Distributed denial-of-service (DDoS) attacks are lessened by CDNs because they spread traffic among a network of servers, improving security and availability. What Challenges Do CDNs Address?CDNs tackle two key challenges to improve website and application performance: Slow load times: Users sometimes experience frustratingly slow-loading websites and applications. This is because data must travel from a server to the end user’s device, causing latency. CDNs move servers closer to end users, reducing the distance that data has to travel and speeding up load times.  High traffic volumes: High traffic volumes during peak times or cyberattacks can overwhelm your website and lead to latency or site unavailability. Since CDNs distribute traffic across multiple servers, no single server is overwhelmed. This helps prevent crashes and delivers smooth performance for all users.Common Use Cases for CDNsCDNs are vital across a range of industries, providing measurable improvements in content delivery and user experience. E-commerce websites use CDNs to guarantee quick page loading and frictionless shopping experiences, even during periods of high traffic. Speed is crucial for online businesses. A study found that the average cost of downtime for e-commerce websites is around $500,000 per hour. This includes lost sales, operational costs, and long-term damage to brand reputation Streaming services rely on CDNs to deliver high-quality video content while minimizing buffering. Netflix states that its CDN contributes to the daily delivery of over 125 million hours of streaming content, guaranteeing a seamless experience for customers worldwide. Gaming companies use CDNs to lower latency and provide a consistent real-time user experience, especially during live multiplayer matches, where it is essential to preserve an engaging and fair gameplay experience. News outlets and blogs benefit from CDNs by ensuring their content loads quickly for readers around the world, during large-scale traffic surges, especially during major events like elections or breaking news.  The Benefits of a CDNFaster Website PerformanceEvery second counts when delivering content online. Slow websites frustrate users and harm your business. CDNs speed up content delivery by caching data closer to users, reducing page and file load times. Whether you’re delivering static content (such as CSS, HTML or JPG files) or dynamic content (like data generated by user interactions or API calls), a CDN ensures optimal performance regardless of user location. While factors like DNS settings, server configurations, and code optimization all play a role, the physical distance between your origin server and your users is a factor that only a CDN can solve. Increased Availability and ReliabilityDowntime can seriously affect online businesses. Hardware failures, traffic surges, and cyberattacks can reduce your website’s availability, harming your customers’ experience and causing financial or reputational damage. In fact, around 98% of organizations report that just one hour of downtime costs over $100,000. A CDN ensures that your website remains available, fast, and reliable by leveraging essential features such as: Load balancing: This process dynamically distributes traffic across multiple servers to optimize performance and prevent overload.Intelligent failover: Automatically redirects traffic if a server goes offline, ensuring continuity with minimal disruption.Anycast routing: Directs users to the closest or most efficient server, further reducing latency and enhancing response times.Security FeaturesAs cyber threats continue to grow in sophistication and frequency, securing your website or application is more critical than ever. According to recent statistics from Cobalt’s 2024 Cybersecurity Report, weekly attacks worldwide increased by 8% in 2023, while attackers used more sophisticated strategies to exploit vulnerabilities. Strong security measures that not only safeguard your website but also guarantee optimal performance are necessary in light of these evolving threats. CDN security features not only improve website performance but also defend against a wide range of attacks by distributing traffic across multiple servers, which mitigates DDoS attacks and filters out malicious traffic before it reaches your website. These features, from DDoS protection to safeguarding APIs, help maintain uptime, protect sensitive data, and guarantee a seamless user experience. Most modern solutions like Gcore CDN integrate robust security measures into content delivery, such as:SSL/TLS encryption facilitates secure data transmission by encrypting traffic, protecting sensitive information from being intercepted.L3/L4 DDoS protection blocks large-scale cyberattacks designed to flood your network and disrupt services.L7 DDoS protection guards your website from more complex attacks targeting how the website functions, helping it continue to operate smoothly.Web application firewall (WAF) acts as a shield, blocking harmful traffic such as hacking attempts or malicious scripts before they can affect your site.API security protects the communication between your application and other software, preventing unauthorized access or data theft.Bot protection identifies harmful automated traffic (bots), preventing activities like data scraping or login attempts with stolen credentials while allowing useful bots (like search engine crawlers) to function normally. Elevate Your Online Experience With a CDNA CDN is no longer a luxury—it’s a necessity for businesses that want to deliver fast, reliable, and secure online experiences. Whether your goal is to optimize performance, manage high traffic, or protect your site from attacks, a well-configured CDN makes all the difference.Ready to enhance your website’s performance? Our futureproof CDN runs on a global network of over 180 points of presence, so your customers get outstanding performance no matter where in the world they’re located. Get in touch with our team today to learn how our CDN can benefit your business.Discover Gcore CDN

How to Migrate Your Video Files to Gcore Video Streaming

Migrating large volumes of video files from different platforms can be daunting and time-consuming, often discouraging companies from moving to a superior provider. But it doesn’t have to be this way. We’ve created this three-step guide to help you efficiently migrate your video files to Gcore from other popular streaming platforms.Step 1: Get Links to Your VideosFirst, obtain links to your videos and download them. Look for your provider in the list below, or refer to the general SFTP/S3 storage section if applicable. After completing the steps for your provider, go straight to step 2.Google DriveShare the file: Open Google Drive and locate the MP4 file you want to download. Right-click on the file and select “Share.”Get the shareable link: In the sharing settings, click “Get link.” Ensure the link-sharing option is turned on.Set sharing permissions: Adjust the sharing permissions so “Anyone with the link” can view or download the file. Copy the generated link.Amazon S3Edit S3 block public access settings: Go to the S3 management console, select the bucket containing your MP4 file, and edit the Block Public Access settings if necessary.Add a bucket policy: Implement a bucket policy that grants public read access to your files.Get the list of objects: Navigate to the Objects tab, find your MP4 file, and click on the file to obtain the Object URL, which will be your download link.VimeoAccess the video: Log in to your Vimeo account and go to the video you wish to download.Select options: Click on the “Settings” button (gear icon) below the video player.Get video file link: In the settings menu, go to the “Video File” tab, where you can find the download link for your MP4 file.MUXEnable master access: Log in to your MUX account, navigate to the video asset, and enable master access if it’s not already enabled.Retrieve URL to master: Once master access is enabled, the URL to the master file will be available in the video asset details. Copy this URL for downloading the file.DropboxCreate a shareable link: Log in to your Dropbox account and locate the MP4 file you want to share. Click on the “Share” button next to the file.Set access permissions: In the sharing settings, create a link and set the permissions to “Anyone with the link.” Copy the generated link to download the file.General SFTP or S3 StorageAccess storage: Log in to your SFTP or S3 storage service control panel.Manage buckets/directories: Navigate to the appropriate bucket or directory containing your MP4 files.Retrieve download links: Generate HTTP/S links for the files you want to download. You can then use these links to download the files directly.Step 2: Check Availability to DownloadEnsure that your video files are available and ready for download, preventing any interruptions or issues during the migration process.Open HTTP/S link in a browser: Copy the HTTP/S link for the MP4 file and paste it into your browser’s address bar. Press Enter to navigate to the link.Check the video plays correctly in the browser: Verify that the video starts playing once the link is opened. This step ensures that the file is accessible and the link is functioning properly.Right-click to download: While the video is playing, right-click on the video player. Select “Save video as…” from the context menu. Choose a destination on your local disk to save the MP4 file.Step 3: Upload to Gcore Video StreamingNo matter which provider you’re migrating from, you need to upload your videos to Gcore Video Streaming storage. There are three primary methods to upload videos to Gcore storage:Copy from external storage: If your videos are available via public HTTPS URLs, you can directly copy the video files from external storage to Gcore. This method efficiently transfers files without downloading them to your local device first.Upload from a local device: Videos can be uploaded from your local host, backend, browser, or mobile app using the TUS resumable upload protocol. This method is resilient to interruptions, ensuring a smooth upload process by resuming from the point of failure.Batch upload: This method will soon be available to migrate extensive collections of videos, allowing you to transfer vast numbers of video files efficiently.The simplest migration option is to obtain video URLs and copy them to Gcore Video Hosting, eliminating the need to download and reupload videos.Example API Request to Copy Video from External StorageTo copy a video from another server, specify the origin_url attribute in the POST API request. The original video will be downloaded for video hosting on our server. Here is an example of the API request to set a task for copying a video from external storage:curl -L 'https://api.gcore.com/streaming/videos/' \-H 'Content-Type: application/json' \-H 'Authorization: APIKey 1234$0d16599c' \-d '{ "video": { "name": "Gcore Demo", "description": "Video copied from an external S3 Storage", "origin_url": "https://s-ed1.cloud.gcore.lu/demo-video/gcore.mp4" } }Refer to the complete documentation for detailed steps and examples of API requests. The original file must be in MP4 format or one of the following formats: 3g2, 3gp, asf, avi, dif, dv, flv, f4v, m4v, mov, mp4, mpeg, mpg, mts, m2t, m2ts, qt, wmv, vob, mkv, ogv, webm, vob, ogg, mxf, quicktime, x-ms-wmv, mpeg-tts, vnd.dlna.mpeg-tts. Streaming formats like HLS (.m3u8/.ts) and DASH (.mpd/.m4v) are intended for final video distribution and cannot be used as original file formats. Here are examples of good and bad links:Good link: https://demo-files.gvideo.io/gcore.mp4Bad link (chunked HLS format): https://demo-files.gvideo.io/hls/master.m3u8Note: Currently, only one video can be uploaded per request, so transferring your library in batches will require automation.Migrate to Gcore Video Streaming TodayGcore Video Streaming makes video migration easy with support for multiple sources and automatic transcoding. Whether you’re moving files from cloud storage, hosting platforms, or API-based services, Gcore streamlines video administration. Store, process, and distribute videos in various formats, complete with features like subtitles and timeline previews.With seamless migration and automatic transcoding, Gcore ensures your videos are optimized and ready for distribution, saving you time and effort. Simplify your video management and ensure your content is always accessible and in the best format for your audience with Gcore’s robust video streaming solutions.

5 Ways to Improve Website Speed for E-Commerce

In part 1 of this guide, we explained why site speed matters for e-commerce and how you can track your current speed.Now, speed up your page load times with these five techniques.#1 Assess Your Current Site SpeedFirst, check your site’s current performance. Use tools like Google PageSpeed Insights or real user monitoring (RUM) tools. PageSpeed Insights evaluates individual web pages for mobile and desktop performance, providing actionable insights to improve speed and user experience.Here’s an example of how your metrics might look:#2 Adopt Code and Image Optimization TechniquesE-commerce websites often have a huge number of images, videos, and/or animations, which can slow down load times. Since these media are essential, the key is to optimize all heavy components.Compress images and use lazy loading via your website host. Minimize redirects and remove broken links, consulting a technical SEO expert if required. These actions can significantly reduce page weight.#3 Adopt CDNs and Edge ComputingThe majority of online shoppers have purchased from an e-commerce store in another country and an additional 22% plan to in the future. Hosting location impacts speed. The further your servers are physically located from your customers, the higher the latency. So, having servers distributed globally improves your load speed and allows you to deliver great customer experiences, no matter where your customers are located.Imagine that your e-commerce website is hosted on a web server in the US, but you have shoppers from the EU. When shoppers from the US browse your store, they may not experience much latency. But shoppers from Germany will, because of the time it takes their browser to send requests to your US server, wait for the server to process them, and deliver a response. A reliable CDN and edge computing provider caching your website content—images, videos, payment portals and all—at the edge makes for speedy content delivery globally.In addition to shortening the distance between your servers and buyers, CDNs also enable load balancing. Say you’re running a Black Friday sale with traffic surges far beyond your normal quantities. Your CDN provider can distribute the traffic evenly between its network of available servers, preventing any one server from being overworked, thereby improving server response times. So, if your Black Friday surge comes mostly from the New York area, a CDN can push some of that traffic from the New York, NY server to the nearby Manassas, VA and Boston, CT servers. Customers won’t notice a difference since both servers are nearby, but spreading the load means all servers continue to perform optimally.#4 Use Fast Authoritative DNSDNS is like the internet’s phone book, translating human-friendly domain names (like www.example.com) into IP addresses that computers use to find each other. When this translation happens quickly, it reduces the time it takes for a user’s browser to locate your website, leading to faster page load times.#5 Rinse and RepeatSite speed optimization is continuous. The internet changes daily; technology advances and competitors emerge. Don’t get comfortable with your site speed. Continuously track speed scores and make improvements.Website Speed Solutions in One Intuitive PlatformWebsite speed is a game-changer for e-commerce success. A website that loads in under a second is the magic number to boost user experience, slash bounce rates, and skyrocket your e-commerce business’ conversion rates.Stay ahead of your e-commerce competitors by choosing tools and platforms designed with your e-commerce website speed in mind. With 180+ PoPs worldwide and a 200+ Tbps network capacity, Gcore CDN and DNS are ideal speed optimization solutions for global e-commerce sites. Contact us today to discover how we can supercharge your site speed.Explore CDN for e-commerce

What Website Speed Is and Why It Matters for E-commerce Success

Website visitors are more impatient than ever—websites that take longer than three seconds to load lose more than half their visitors. For an e-commerce business, that translates to losing half its potential sales, which is bad news for revenue. In this article, we explain what e-commerce website speed is, how it’s measured, and how you can improve it for better customer retention and higher sales.Why Does Site Speed Matter?Website speed measures the time from when visitors click your link to when they see a fully functioning page. With the surge in e-commerce businesses around the world, buyers have many choices and will quickly abandon slow-loading websites out of frustration. Most customers won’t return to a slow website, and 89% will turn to a faster competitor. Satisfied customers are more likely to recommend your website to others, making high user satisfaction an effective marketing strategy.Just a second—or less—of load time can make the difference between a potential customer purchasing from you or your competitor. Conversion rates drop markedly with every additional second of load time. If your site loads in one second or less, you’re looking at a 3% conversion rate. That almost halves when you add just one second of wait time.That’s not surprising, since churn and bounce rates increase with slower load times, meaning potential buyers either leave your site before interacting and/or don’t return.Page load times also affect search engine optimization (SEO) rankings—your spot on search engine results pages. When buyers search for your products, if you don’t appear at the top, your competitors will—and your customers are more likely to visit their site instead of yours.Evidently, optimizing page load time is a non-negotiable for any e-commerce business.Metrics and Indicators to TrackSpeed can be measured and reflected by either technical or business metrics.Technical IndicatorsGoogle Core Web Vitals are metrics that measure various features contributing to a high-quality page experience. They’re an industry-standard way to measure your technical website load speed.Largest contentful paint (LCP) is the time it takes for the largest content on your site to load. An ideal LCP value is below 2.5 seconds, while above 4 seconds signals a poor page experience.First input delay (FID) is the delay between a user’s interaction (e.g., clicking a button) and the browser’s response. Google considers any FID value below 100 ms good, and above 300 ms poor.Cumulative layout shift (CLS) measures how much your content moves around while loading. Poor CLS can cause users to accidentally click on the wrong buttons.Keep track of the following additional technical metrics:Time to first byte (TTFB) is the time between a browser requesting your webpage and the first byte of data arriving. It often triggers the “reduce initial server response time” message in page speed diagnostics.Time to interactive (TTI) measures the time it takes for your website to become fully interactive. Google considers a TTI of below 5 seconds good, and above 7.3 seconds poor.Round-trip time (RTT) is the time it takes for requests to reach the origin server, be processed, and return to the client.Business MetricsThese metrics give you insights into how your website’s speed impacts sales. Although they’re not a direct speed measurement, speed has a direct impact on them.Conversion rate measures the percentage of your website’s visitors who make a purchase.Engagement time measures how much time customers actively spend on your website, such as browsing products or making a purchase. It’s connected to bounce rate, which is the opposite—how many customers leave your site without engaging at all, often caused by slow loading.Search ranking affects your site’s visibility, traffic, and revenue. Fast load times contribute to better SEO rankings.Explore part 2 of this guide to discover 5 practical tips to speed up your e-commerce website performance.

Improve Your Privacy and Data Security with TLS Encryption on CDN

The web is a public infrastructure: Anyone can use it. Encryption is a must to ensure that communications over this public infrastructure are secure and private. You don’t want anyone to read or modify the data you send or receive, like credit card information when paying for an online service.TLS encryption is a basic yet crucial safeguard that ensures only the client (the user’s device, like a laptop) and server can read your request and response data; third parties are locked out. You can run TLS on a CDN for improved performance, caching, and TLS management. If you want to learn more about TLS and how running it on a CDN can improve your infrastructure, this is the right place to start.What Is TLS Encryption and Why Does It Matter?TLS, transport layer security, encrypts data sent via the web to prevent it from being seen or changed while it’s in transit. For that reason, it’s called encryption in-transit technology. TLS is also commonly called HTTPS when used with HTTP or SSL, as previous versions of the technology were based on it. TLS ensures high encryption performance and forward secrecy. To learn more about encryption, check out our dedicated article.TLS is a vital part of the web because it ensures trust for end users and search engines alike. End users can rest assured that their data—like online banking information or photos of their children—can’t be accessed. Search engines know that information protected by TLS is trustworthy, so they rate it higher than non-protected content.What’s the Connection Between TLS and CDN?A CDN, or content delivery network, helps improve your website’s performance by handling the delivery of your content from its own servers rather than your website’s server. When a CDN uses TLS, it ensures that your content is encrypted as it travels from your server to the CDN and from the CDN to your users.With TLS offloading, your server only needs to encrypt the content for each CDN node, not for every individual user. This reduces the workload on your server.Here’s a simple breakdown of how it works:Your server encrypts the content once and sends it to the CDN.The CDN caches this encrypted content.When a user requests the content, the CDN serves it directly to them, handling all encryption and reducing the need to repeatedly contact your server.Without a CDN, your server would have to encrypt and send content to each user individually, which can slow things down. With a CDN, your server encrypts the content once for the CDN. The CDN then takes over, encrypting and serving the content to all users, speeding up the process and reducing the load on your server.Figure 1: Comparison of how content is served with TLS on the web server (left) vs on CDN (right)Benefits of “Offloading” TLS to a CDNOffloading TLS to a CDN can improve your infrastructure with improved performance, better caching, and simplified TLS management.Increased PerformanceWhen establishing a TLS connection, the client and server must exchange information to negotiate a session key. This exchange involves four messages being sent over the network, as shown in Figure 2. The higher the latency between the two participants, the longer it takes to establish the connection. CDN nodes are typically closer to the client, resulting in lower latency and faster connection establishment.As mentioned above, CDN nodes handle all the encryption tasks. This frees up your server’s resources for other tasks and allows you to simplify its code base.Figure 2: TLS handshakeImproved CachingIf your data is encrypted, the CDN can’t cache it. A single file will look different from the CDN nodes for every new TLS connection, eliminating the CDN benefits (Figure 3). If the CDN holds the certificates, it can negotiate encryption with the clients and collect the files from your server in plaintext. This allows the CDN to cache the content efficiently and serve it faster to users.Figure 3: TLS and CDN caching comparedSimplified TLS ManagementThe CDN takes care of maintenance tasks such as certificate issuing, rotation, and auto-renewal. With the CDN managing TLS, your server’s code base can be simplified, and you no longer need to worry about potential TLS updates in the future.TLS Encryption with Gcore CDNWith the Gcore CDN we don’t just take care of your TLS encryption, but also file compression and DNS lookups. This way, you can unburden your servers from non-functional requirements, which leads to smaller, easier-to-maintain code bases, lower CPU, memory, and traffic impact, and a lower workload for the teams managing those servers.Gcore CDN offers two TLS offloading options:Free Let’s Encrypt certificates with automatic validation, an effective and efficient choice for simple security needsPaid custom certificates, ideal if your TLS setup has more complex requirementsHow to Enable HTTPS with a Free Let’s Encrypt CertificateSetting up HTTPS for your website is quick, easy, and free. First, make sure you have a Gcore CDN resource for your website. If you haven’t created one yet, you can do so in the Gcore Customer Portal by clicking Create CDN resource in the top-right of the window (Figure 4) and following the setup wizard. You’ll be asked to update your DNS records so they point to the Gcore CDN, allowing Gcore to issue the certificates later.Figure 4: Create CDN resourceNext, open the resource settings by selecting your CDN resource from the list in the center (Figure 5).Figure 5: Select the CDN resourceEnable HTTPS in the resource settings, as shown in Figure 6:Select SSL in the left navigationClick the Enable HTTPS checkboxClick Get SSL certificateFigure 6: Get an SSL certificateYour certificate will usually be issued within 30 minutes.Our Commitment to Online SecurityAt Gcore, we’re committed to making the internet secure for everyone. As part of this mission, we offer free CDN and free TLS certificates. Take advantage and protect your resources efficiently for free!Get TLS encryption on Gcore CDN free

Subscribe to our newsletter

Get the latest industry trends, exclusive insights, and Gcore updates delivered straight to your inbox.