Logs
Raw logs: export CDN resource logs to a storage
Raw Logs is an option that enables an automatic export of CDN resource logs to your storage. Logs contain information about user requests sent to cache servers and pre-cache servers (if the Origin Shielding is enabled).
It’s OK if you find a field that’s not listed in the example. We occasionally add new fields to the end of the line. If some fields are added to logs, you’ll receive an email about the update.
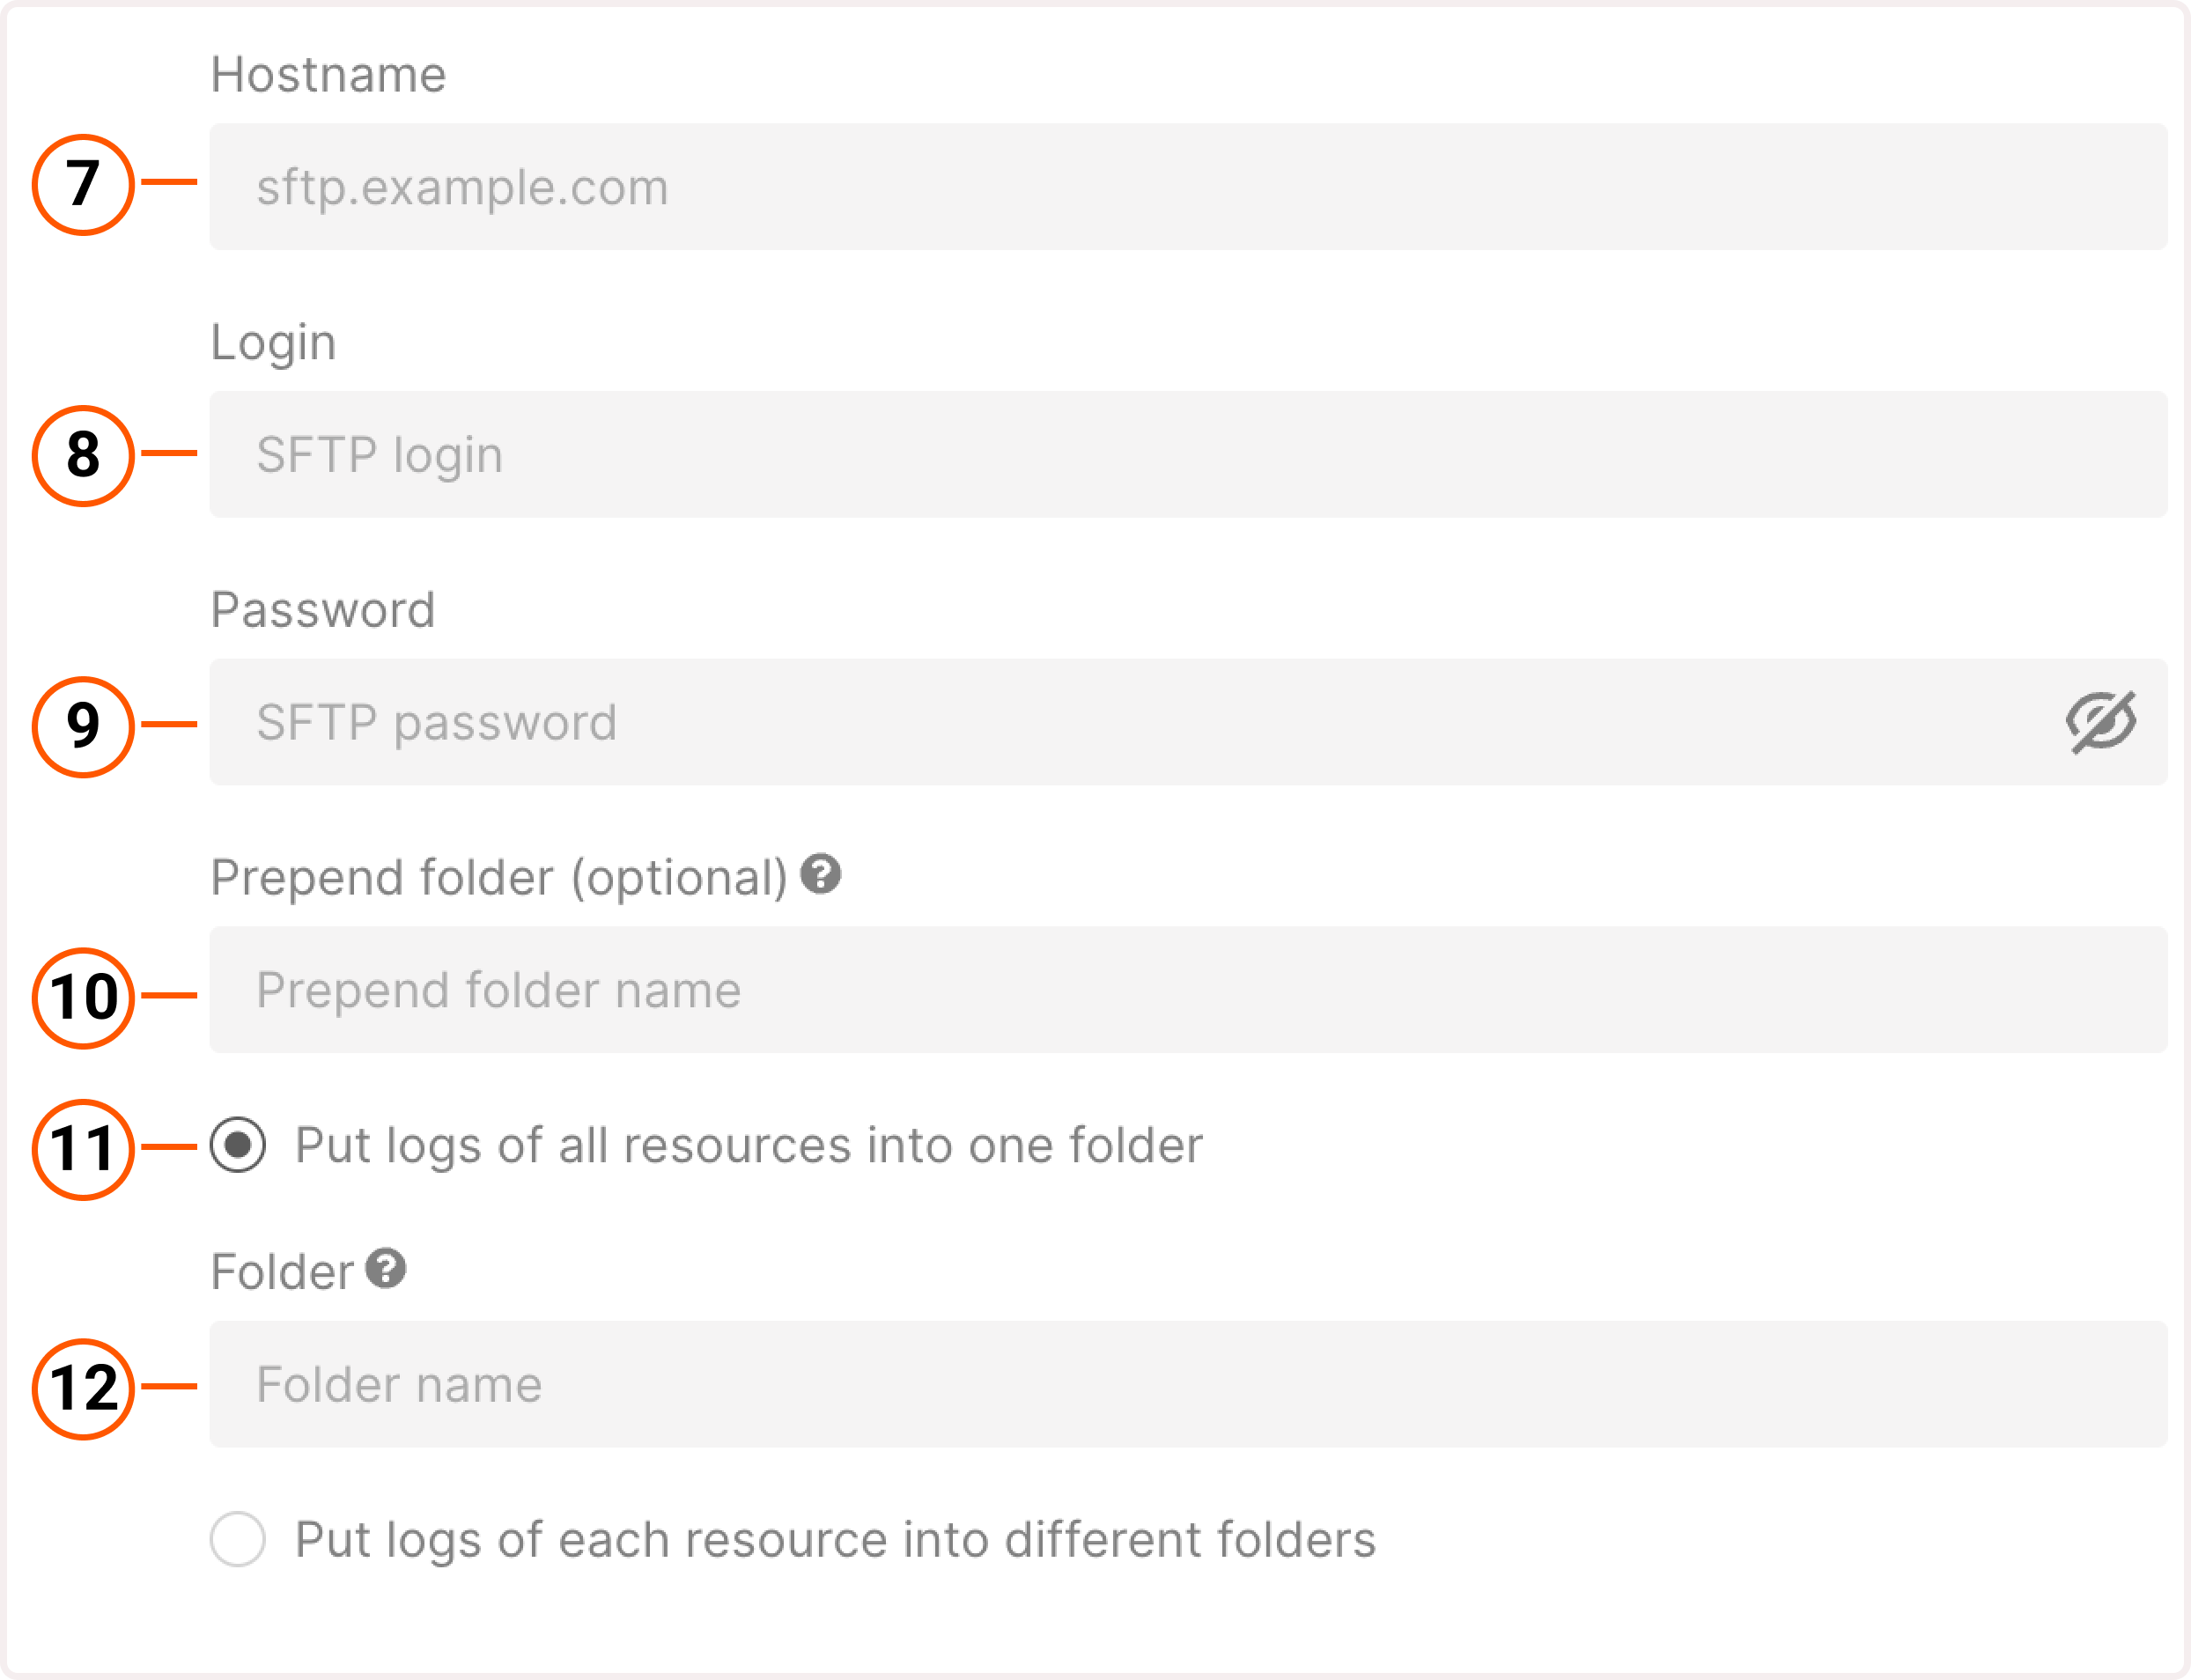
 6. Specify a hostname—a name that’s assigned to a storage server within a network and is used instead of an IP address. If you use Gcore SFTP Storage, you can find its hostname in the Details of the storage in the Hostname field. It looks as follows:
7. Specify a username you use to log in to the storage. If you use Gcore SFTP storage, you can find the username in the Details of your storage in the Storage/User name field.
8. Enter the password you use to authenticate to the storage.
9. Specify a folder for export. If you use Gcore SFTP storage, specify the root (home) folder where other folders originate from. You can find its name in the Details of your storage at the end of the Upload path field.
If you use an SFTP storage from another provider, clarify whether a root folder that includes other folders is created by default. If not, leave the field empty. If yes, specify a folder name.
10. Choose how to organize the storage: put logs of all CDN resources into one folder or use separate folders for each CDN resource. Then, specify a folder name. If you specify a non-existent folder, logs will be exported to a root folder.
11. (Optional) Specify the folder name where logs will be stored. If you specify a non-existent folder, logs will be exported to a root folder. For Gcore SFTP storage, you can only specify the default htdocs folder.
6. Specify a hostname—a name that’s assigned to a storage server within a network and is used instead of an IP address. If you use Gcore SFTP Storage, you can find its hostname in the Details of the storage in the Hostname field. It looks as follows:
7. Specify a username you use to log in to the storage. If you use Gcore SFTP storage, you can find the username in the Details of your storage in the Storage/User name field.
8. Enter the password you use to authenticate to the storage.
9. Specify a folder for export. If you use Gcore SFTP storage, specify the root (home) folder where other folders originate from. You can find its name in the Details of your storage at the end of the Upload path field.
If you use an SFTP storage from another provider, clarify whether a root folder that includes other folders is created by default. If not, leave the field empty. If yes, specify a folder name.
10. Choose how to organize the storage: put logs of all CDN resources into one folder or use separate folders for each CDN resource. Then, specify a folder name. If you specify a non-existent folder, logs will be exported to a root folder.
11. (Optional) Specify the folder name where logs will be stored. If you specify a non-existent folder, logs will be exported to a root folder. For Gcore SFTP storage, you can only specify the default htdocs folder.
 12. Click Save changes.
You’ve successfully configured Raw Logs export to FTP or SFTP storage.
12. Click Save changes.
You’ve successfully configured Raw Logs export to FTP or SFTP storage.
InfoThis is a paid feature. To activate Raw Logs, contact the Gcore support team. After activation, enable Raw Logs in the Gcore Customer Portal and configure export to S3, FTP, or SFTP storage.
Raw logs settings
In this section, you can find general information about log settings, overview of log statuses, and details on how Raw Logs are exported and calculated.Add logs from origin shielding
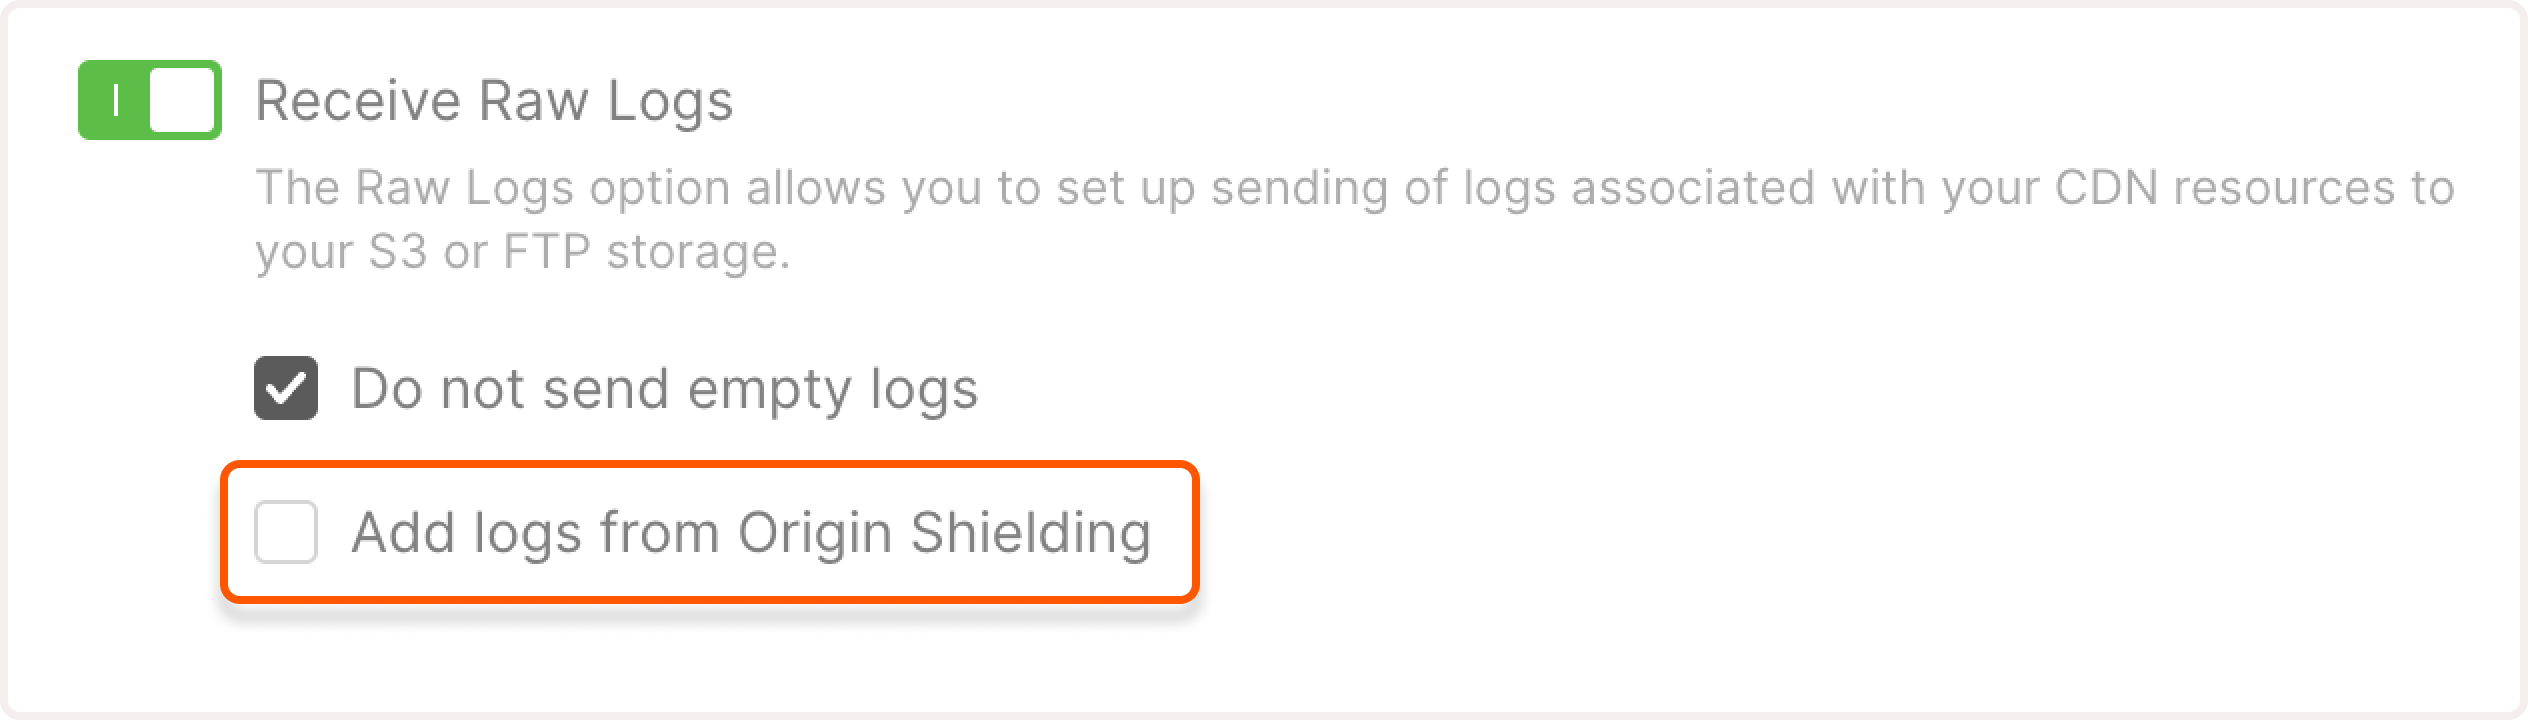
If you are using the Origin Shielding feature, you’ll see the Add logs from origin shielding checkbox when configuring logs. We recommend that you select this option as it ensures that the logs report will include both requests to cache services and requests to the pre-cache server. Thus, you’ll receive more detailed information on resource usage. When setting up Raw Logs, select the checkbox to enable Add logs from origin shielding.TipIf you don’t see the Origin Shielding option on the Raw Logs page, this feature is not activated for your account. For details on how to activate Origin Shielding, check our dedicated guide.
Raw logs statuses
You can check the status of the Raw Logs in the Gcore Customer Portal:- Pending : A status for the time interval between the connection to storage and the first log export.
- OK : Logs are exported from at least one CDN server.
- Failed : An error occurred while connecting to a storage, or the service failed to export logs within 24 hours.
- Pause : The Raw Logs feature is paused.
Export time intervals
Logs are exported at the end of each hour. If you activate Raw Logs at 00:30, the first logs will be exported between 00:45 and 01:00 and the next ones—between 01:45 and 02:00. If CDN servers are not requested and you didn’t select the Do not send empty logs checkbox when configuring Raw Logs, an empty log file (± 20 bytes) will be sent to your storage.Log traffic calculation
Logs can generate various types of analytics, such as delivered traffic. To understand what the totals mean, we recommend that you familiarize yourself with the formulas for calculating logs. For details about CDN reports, check out the View statistics on CDN resources guide. The formula for calculating traffic depends on whether you’ve selected the Add logs from origin shielding option for Raw Logs.If Origin Shielding is disabled
If Origin Shielding is disabled
If this feature is disabled, the formula will look like this:Where:
upstream_bytesare equal to the$upstream_response_lengthlog field and refer to the response length from an origin in bytessent_bytesare equal to the$bytes_sentlog field and refer to the number of bytes sent to a user from the edge (cache) servers
$upstream_response_length is 10485760 (bytes) and $bytes_sent is 1514848 (bytes), the final value in the Raw logs report will be 12,000,608 (bytes).If Origin Shielding is enabled
If Origin Shielding is enabled
If this feature is enabled, the formula will look like this:Where:
upstream_bytesare equal to the$upstream_response_lengthlog field and refer to the response length from an origin in bytessent_bytesare equal to the$bytes_sentlog field and refer to the number of bytes sent to a user from the edge (cache) serversshield_bytesare equal to the$bytes_sentlog field and refer to the number of bytes sent to a user from the pre-cache server
InfoThe final value of log data may differ slightly from the billing statistics as there may be cases where not all logs are received, such as: * You are using the Origin Shielding feature but didn’t select the Add logs from origin shieldin g option. * You have a rate limit set on your storage side, and when CDN started generating logs, some logs weren’t downloaded because of the rate limitation.
Log path example
Log example
Log format
Log fields
The following table contains a complete list of available log fields. Fields formatted in italics relate to our internal CDN system, so you can ignore them. You can check other fields—they can be helpful for traffic analysis or statistics.View log fields
View log fields
| Field | Log value example | Description |
|---|---|---|
$remote_addr | 0.0.0.0 | User’s IP address |
$remote_user(internal system variable) | - | Username used in Basic authentication |
[$time_local] | [26/Apr/2019:09:47:40 +0000] | Local time in Common Log Format |
$request | GET /ContentCommon/images/image.png HTTP/1.1 | HTTP method, requested file path, and HTTP version |
$status | 200 | Response status code from a CDN server |
$body_bytes_sent | 1514283 | Number of bytes sent to a user, excluding the response header size |
$http_referer | https://example.com/videos/10 | Referrer – a URL requested by a user |
$http_user_agent | Mozilla/5.0 (Macintosh; Intel Mac OS X 10_12_1) AppleWebKit/537.36 (KHTML, like Gecko) Chrome/53.0.2785.116 YaBrowser/16.10.0.2309 Safari/537.36 | User agent that was used to send a request (browser or other application) |
$bytes_sent | 1514848 | Number of bytes sent to a user |
$edgename | [dh-up-gc18] | CDN server that forwarded a requested file |
$scheme | https | Protocol (HTTP or HTTPS) of a request |
$host | cdn.example.com | Requested hostname of a CDN resource |
$request_time | 1.500 | Request processing time in seconds (accurate to milliseconds); time elapsed between the first bytes of a request being processed and logging after the last bytes were sent to a user |
$upstream_response_time | 0.445 | Number of seconds (accurate to milliseconds) it took to receive a response from an origin. In case of multiple responses, commas and colons are used |
$request_length | 157 | Request length (including request line, header, and request body) |
$http_range | bytes=0-1901653 | File fragment size in a Range request |
[$responding_node] | dh | Responding data center |
$upstream_cache_status | MISS | Status of a requested file in CDN cache: HIT: response served from the CDN cache. STALE: outdated response that failed to update (origin not responding or responding incorrectly). UPDATING: outdated response still updating from a previous request. REVALIDATED: response matching one on an origin (based on the proxy_cache_revalidate directive).EXPIRED: response has expired in cache but still matches one on an origin; a request was sent to an origin for re-caching. MISS: response served directly from an origin rather than from a cache. BYPASS: response for the first file request after clearing the cache. Appears when the file is requested by each CDN server (the first request from that server results in BYPASS, subsequent requests result in HIT). |
$upstream_response_length | 10485760 | Response length from an origin in bytes. In case of multiple responses, commas and colons are used |
$upstream_addr | 0.0.0.0:80 | Origin’s IP address and port |
$gcdn_api_client_id(internal system variable) | 123 | Your ID in our system |
$gcdn_api_resource_id(internal system variable) | 01 | Your CDN-resource ID in our system |
$uid_got(internal system variable) | - | Cookie name and received user ID |
$uid_set(internal system variable) | - | Cookie name and provided user ID |
$geoip_country_code | KZ | User’s country code according to the ISO 3166 standard (Alpha-2 code) |
$geoip_city | - | User’s city code |
$shield_type(internal system variable) | shield_no | Indicates whether Origin Shielding is enabled: shield_old – enabled shield_no – disabled |
$server_addr(internal system variable) | 0.0.0.0 | IP address of an Anycast zone or CDN server |
$server_port(internal system variable) | 80 | Requested port |
$upstream_status | 206 | Origin response code |
$upstream_connect_time | 0.000 | Number of seconds (accurate to milliseconds) it took to access an origin server |
$upstream_header_time | 0.200 | Number of seconds (accurate to milliseconds) it took to receive a response header from an origin server |
$shard_addr(internal system variable) | 0.0.0.0 | IP address of a CDN server that was first to accept a request if the Cache Sharding feature is enabled |
$geoip2_data_asnumber | asnumber | Number of an autonomous system that sent a request |
$connection(internal system variable) | 2897494295 | Connection serial number |
$connection_requests(internal system variable) | 1 | Current number of requests made through a connection |
$http_traceparent | 00-d5fe1dc9035165ce36952daf29686b6c-14330be33197dd1a-01 | Unique request identifier. More info in the Traceparent guide |
$http_x_forwarded_proto | - | Initial protocol of an incoming request (HTTP or HTTPS) |
$gcdn_internal_status_code(internal system variables) | - | Initial status code. Possible values are - or 100700 |
$ssl_cipher(internal system variable) | ECDHE-RSA-AES256-GCM-SHA384 | Cipher name used for an established SSL connection |
$ssl_session_id(internal system variable) | 28a4184139cb43cdc79006cf2d1a4ac93bdc**** | Session ID of an established SSL connection |
$ssl_session_reused(internal system variable) | r | Shows whether a session was reused (r) or not (.) |
$sent_http_content_type | application/json | Value of the Content-Type HTTP header, indicating the MIME type of a transmitted file |
$tcpinfo_rtt | 21 | Average time (latency) it takes to transfer a packet to/from a server. The unit of time is microseconds. |
$server_country_code | PL | Server’s country code according to the ISO 3166 standard (Alpha-2 code). |
$gcdn_tcpinfo_snd_cwnd | 45 | Size of the TCP Congestion window, i.e., the maximum number of TCP segments that the connection can send before an acknowledgment is required |
$tcpi_total_retrans | 10 | Total number of retransmitted packets over the life of the connection |
$gcdn_rule_id | 100700 | Initial rule ID (beta). Possible values are - or 100700 |
Export logs to S3 storage
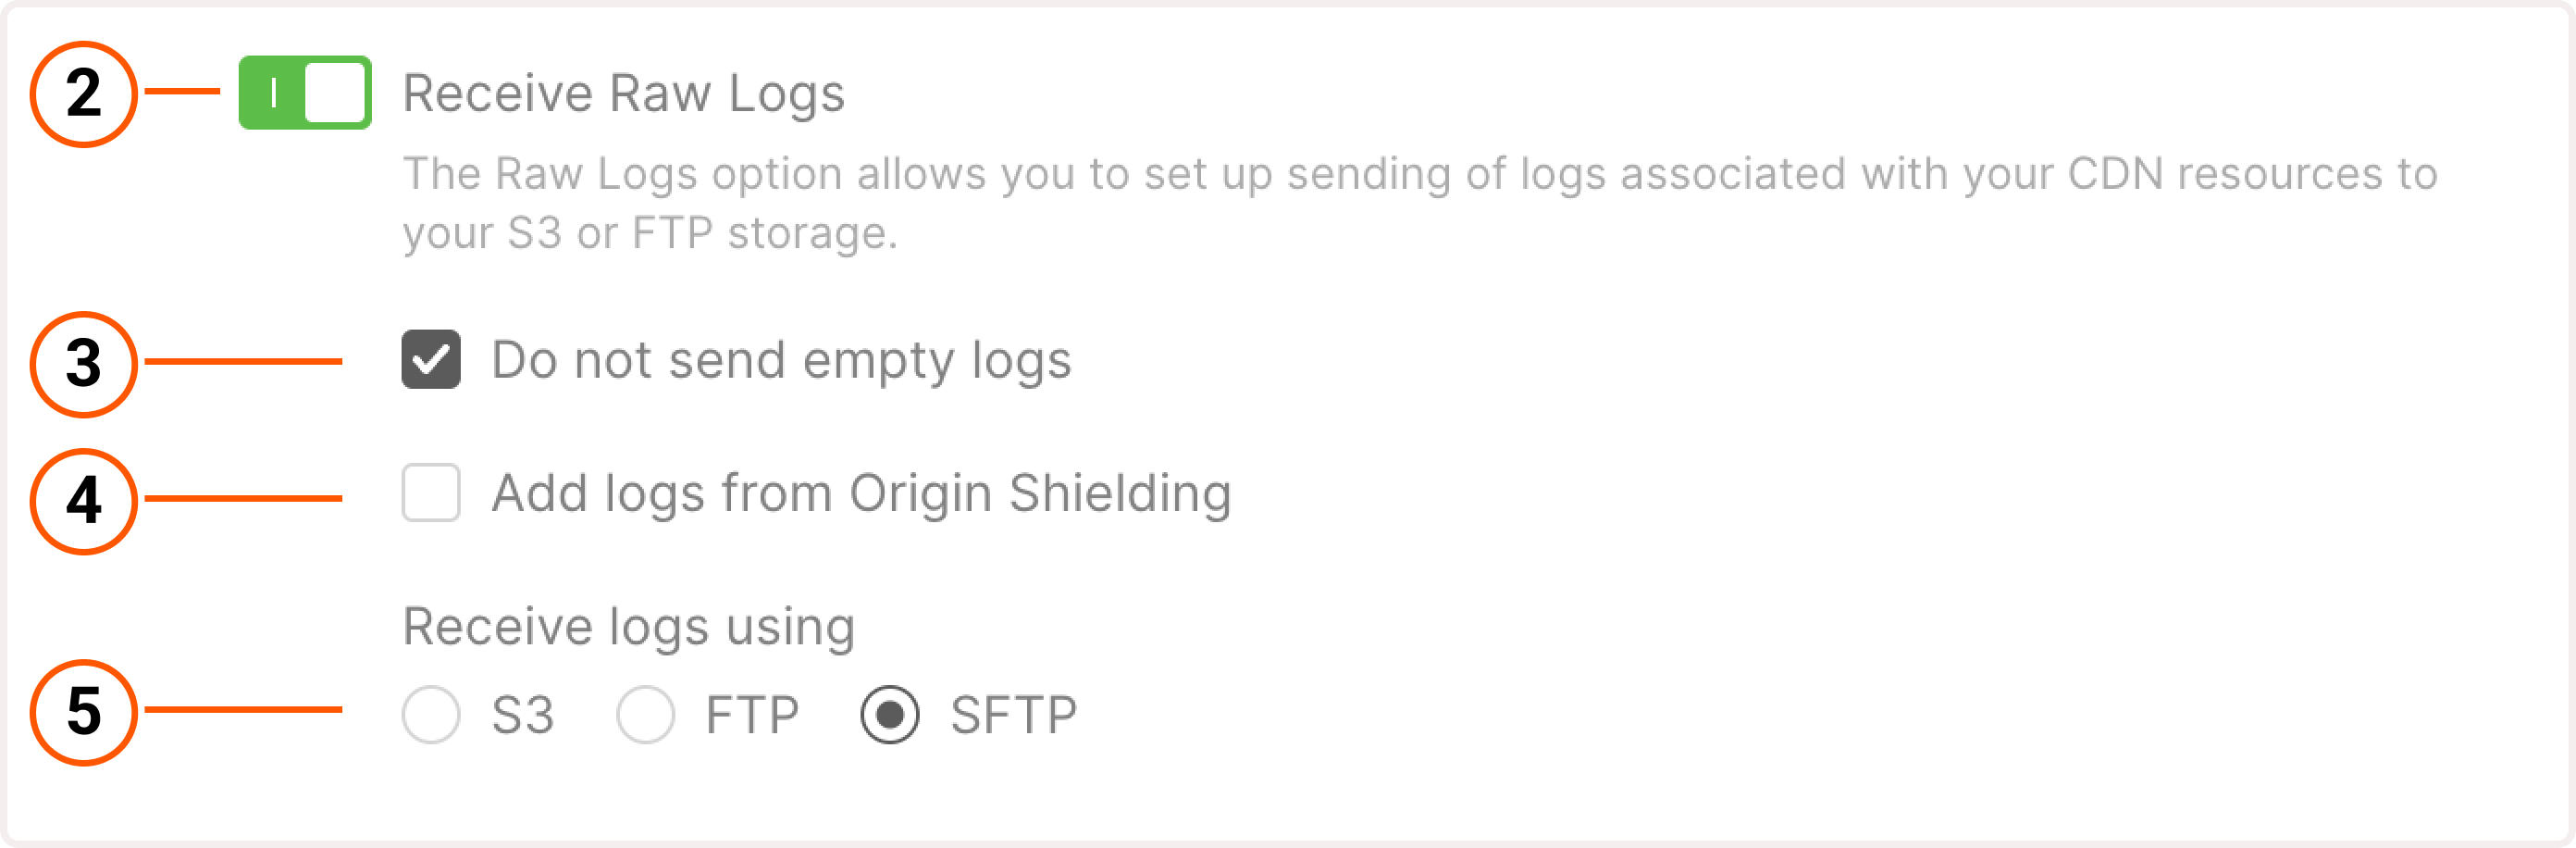
1. In the Gcore Customer Portal, navigate to CDN > Logs.2. Enable the Receive Raw Logs toggle to open log settings.3. Keep the Do not send empty logs option selected if you don’t want to receive empty logs. Otherwise, uncheck it.4. If you use our Origin Shielding feature, you’ll see a checkbox Add logs from origin shielding. Select the checkbox to receive logs from both edge servers and pre-cache shielding servers.5. Select to receive logs using S3.6. Choose Amazon as the storage type.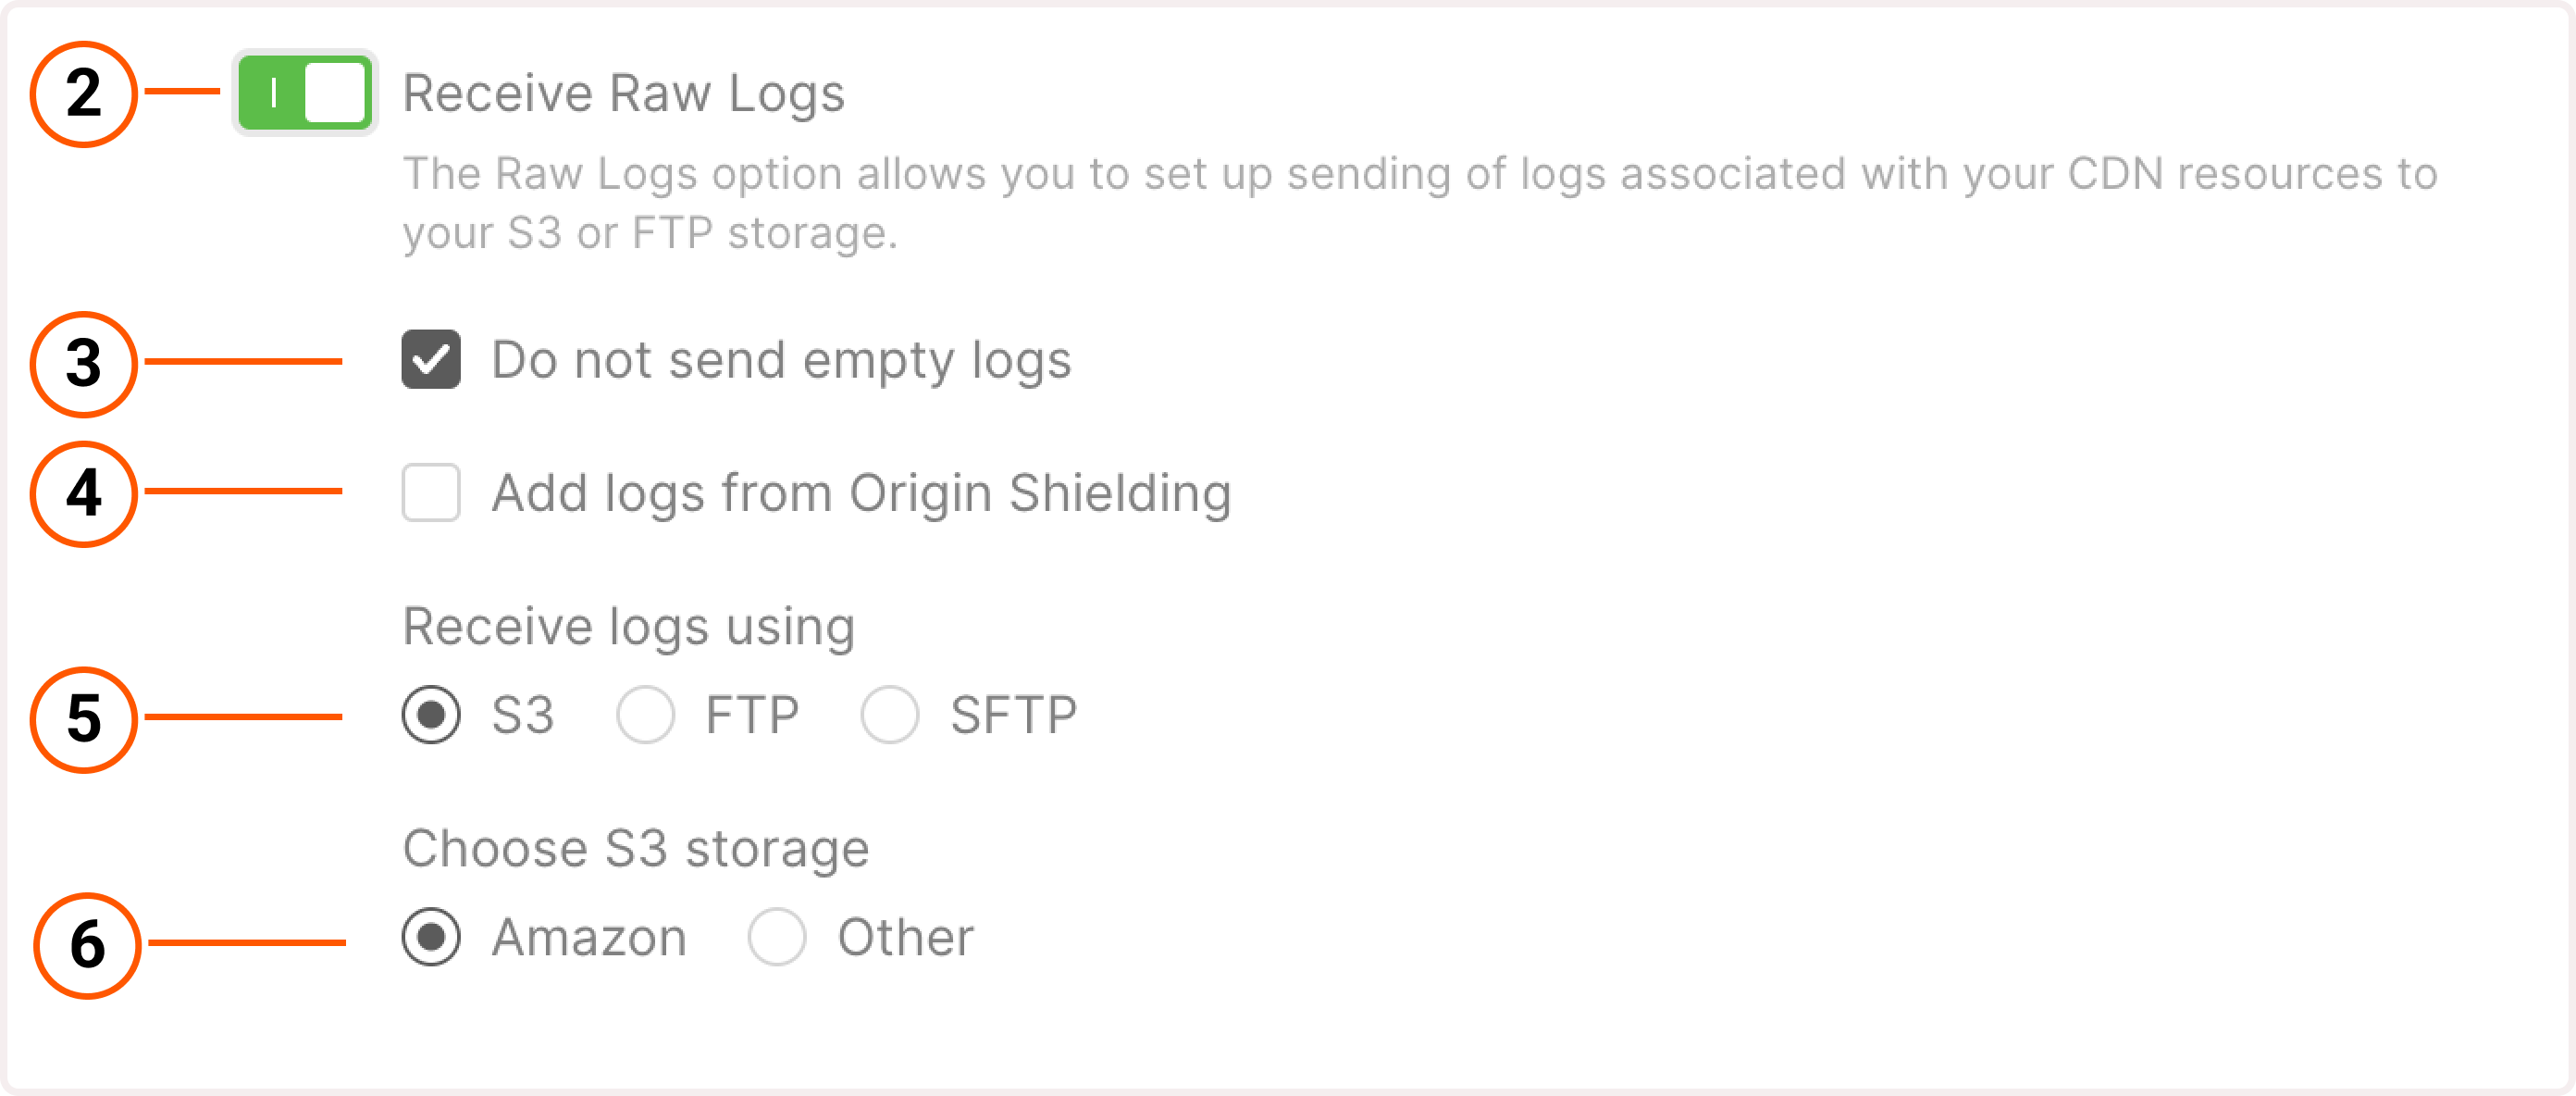 7. Specify your access key ID. In your Amazon personal account, it’s called “AWS access key ID”. For details on how to find your key ID, check the official Amazon guide. An access key ID and secret access key are required to configure log export to your storage.8. Specify your secret access key. In your Amazon account, it’s called “AWS secret access key”. For details on how to find your access key, check the official Amazon guide.9. (Optional) Enter your AWS region—the location of a server where your storage is hosted. For most storage types, the region is determined automatically, so you might leave the field empty. However, we recommend specifying the region to ensure that your logs are exported successfully.10. Choose how to organize your storage: put logs of all CDN resources into one bucket or use separate buckets for each CDN resource.11. Specify buckets for log export. Make sure to indicate an existing bucket. Otherwise, your logs won’t be exported.
Enter a folder name if you want to export logs to a specific folder within a bucket.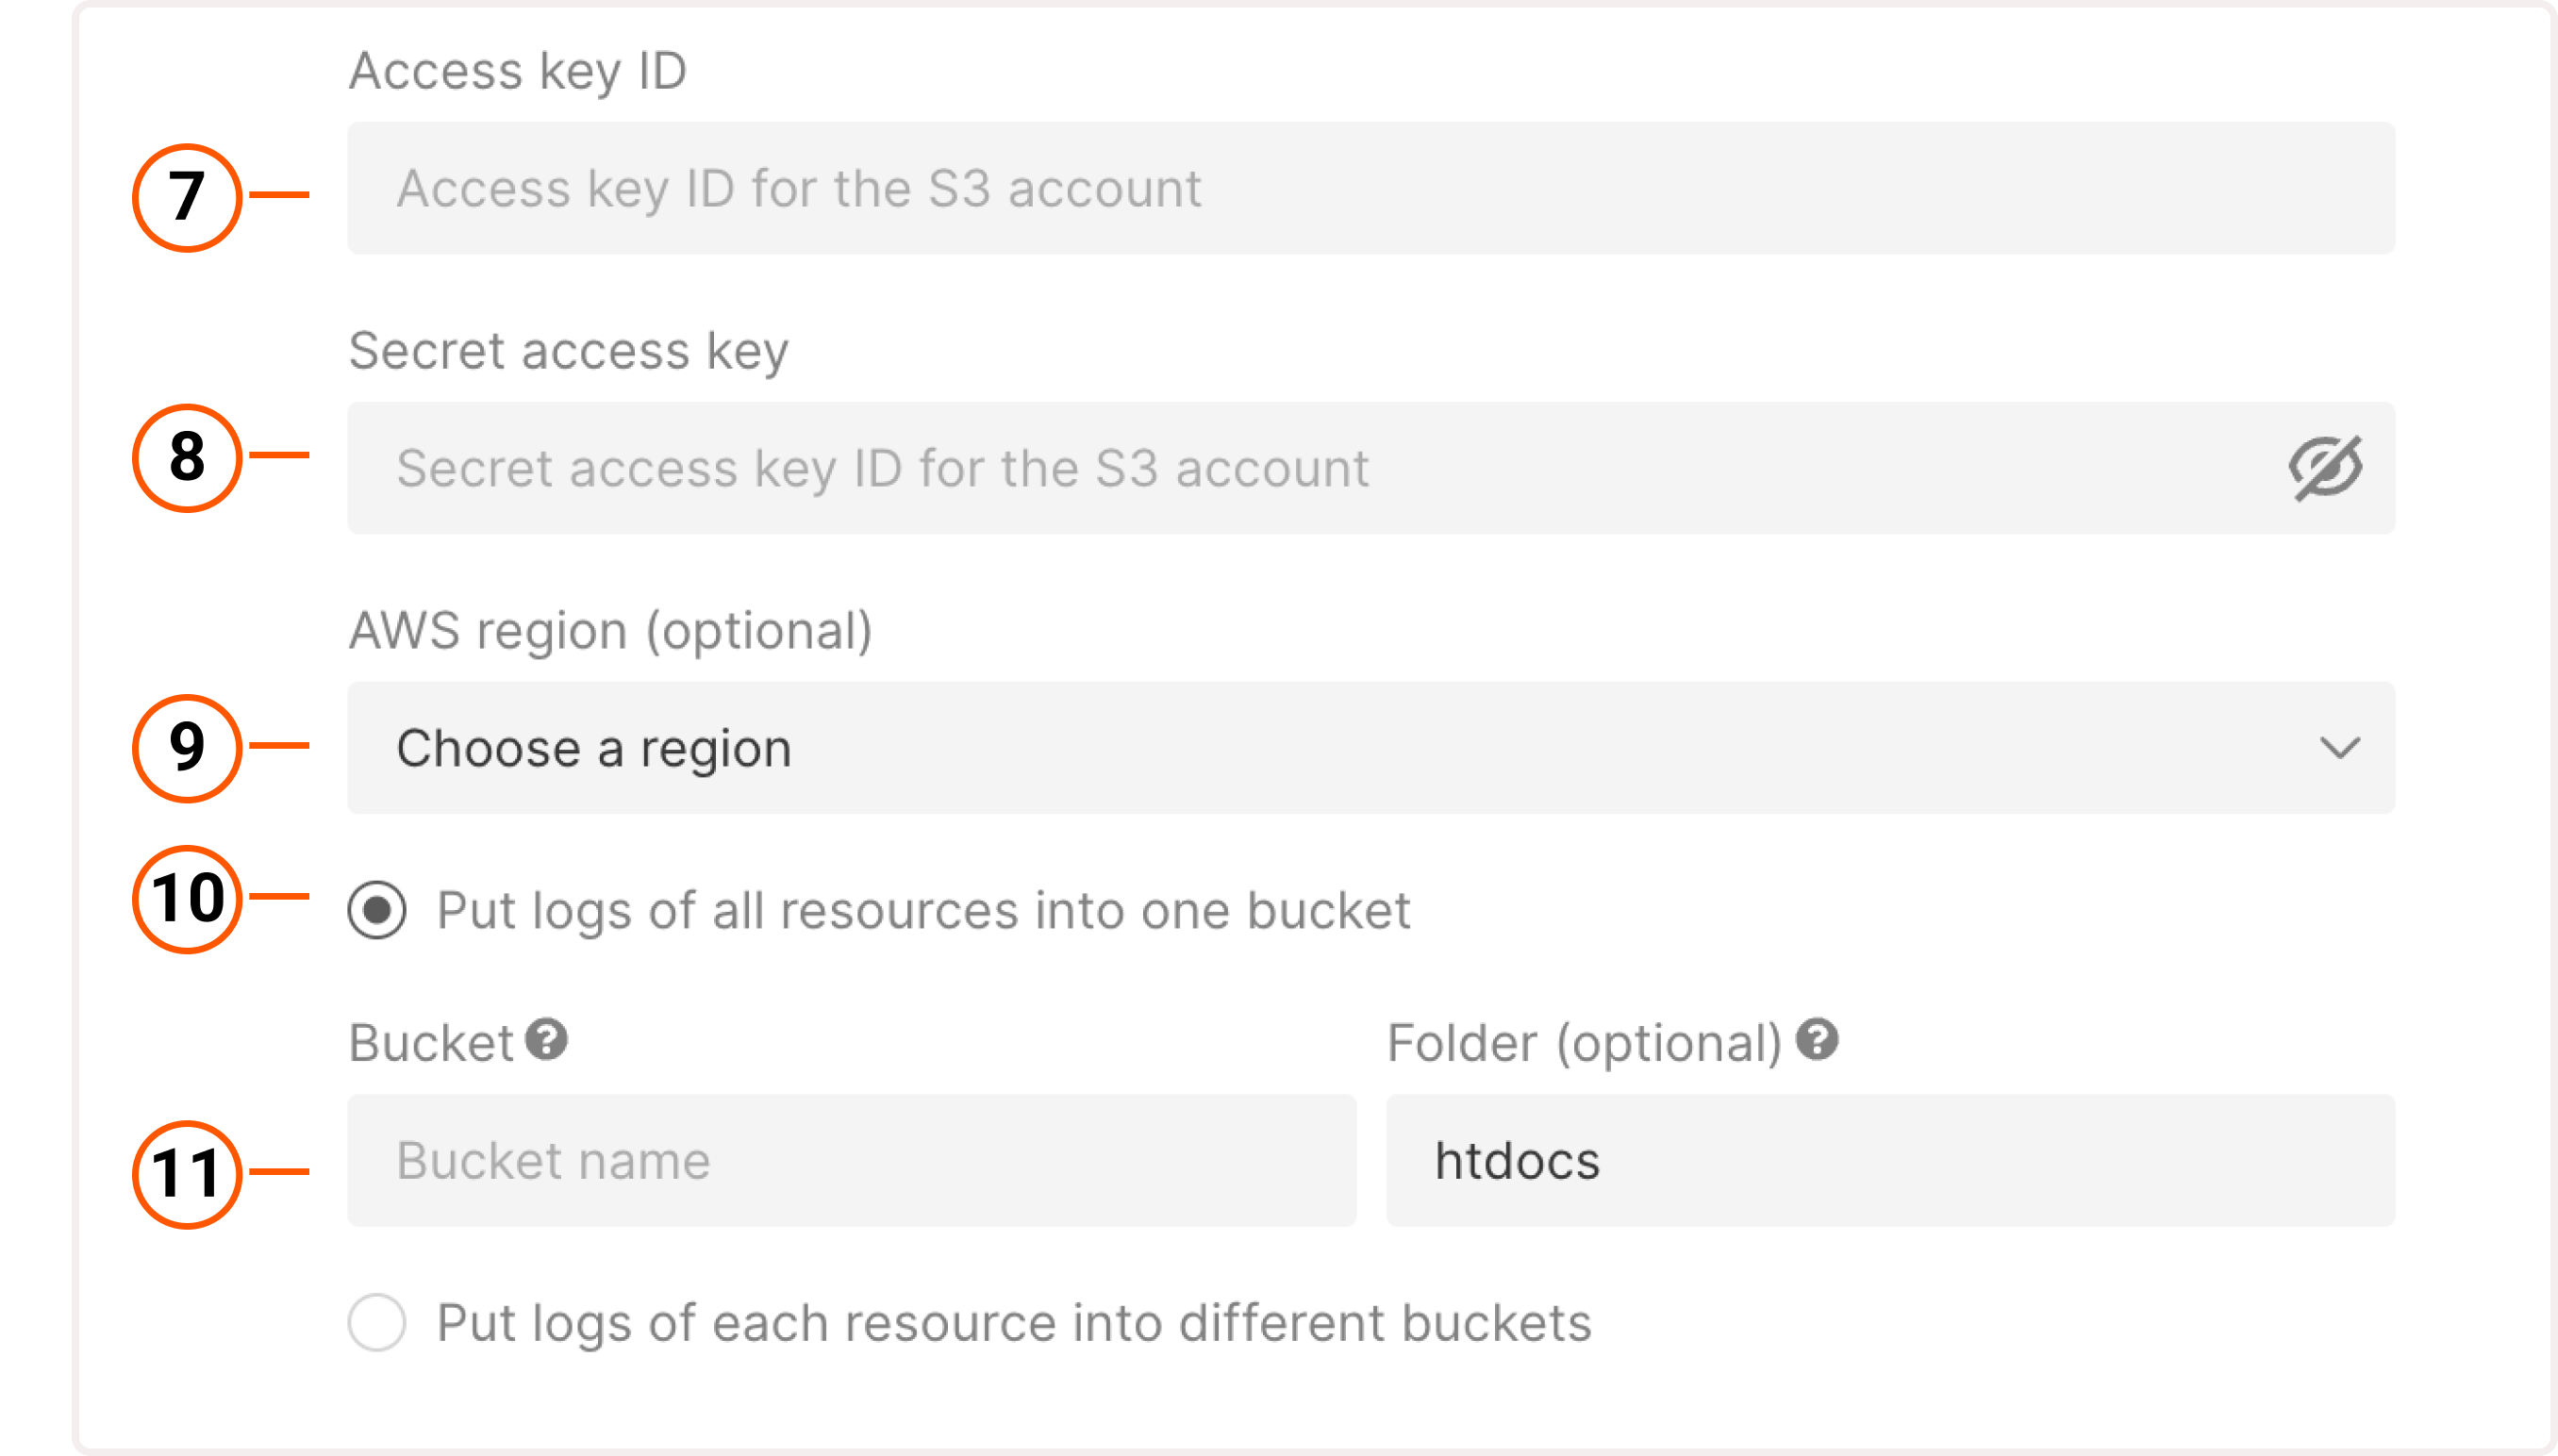 12. Click Save changes.You’ve successfully configured Raw Logs export to Amazon S3.
Enter a folder name if you want to export logs to a specific folder within a bucket.
Export logs to FTP or SFTP storage
1. In the Gcore Customer Portal, navigate to CDN > Logs. 2. Enable the Receive Raw Logs toggle to open log settings. 3. Keep the Do not send empty logs option selected if you don’t want to receive empty logs. Otherwise, uncheck it. 4. If you use our Origin Shielding feature, you’ll see a checkbox Add logs from origin shielding. Select the checkbox to receive logs from both edge servers and pre-cache shielding servers. 5. Select to receive logs via SFTP.ams.origin.gcdn.co.
WarningYou need to specify an FTP or SFTP storage port after the hostname. For example:
ams.origin.gcore.co:2200. Otherwise, you’ll get the “Wrong connection settings error” and won’t be able to connect to the storage.InfoIf you’re using the Gcore SFTP storage, you won’t be able to write to the home folder. It only receives logs and can’t be manually modified.
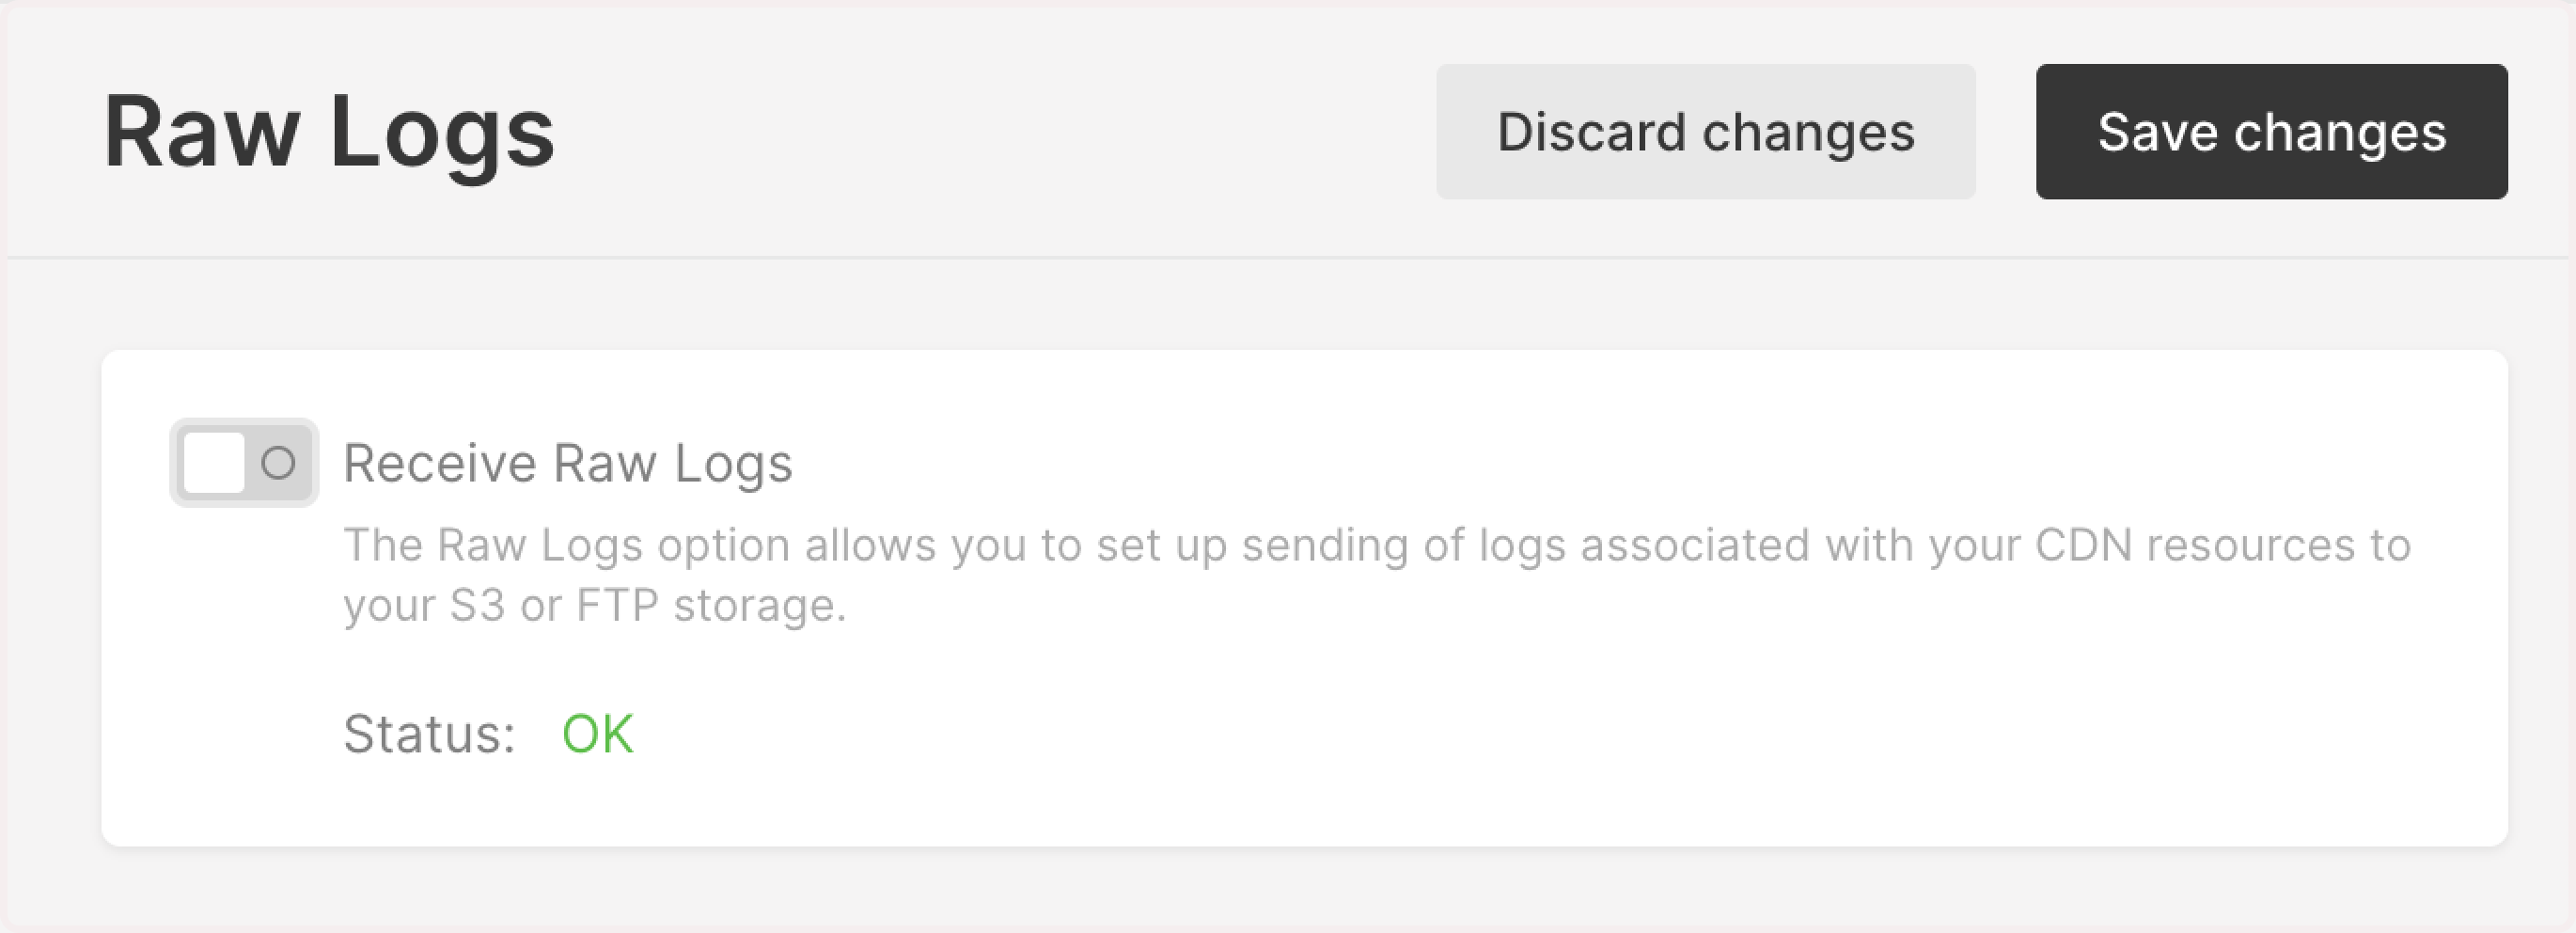
Deactivate raw logs
To stop Raw Logs delivery, disable the Receive Raw Logs toggle. If you disable the logs, your settings will be saved. You can always activate the same configuration by enabling the Receive Raw Logs toggle again. If you made any changes to the configuration, click Discard changes to cancel any changes made during the editing process.